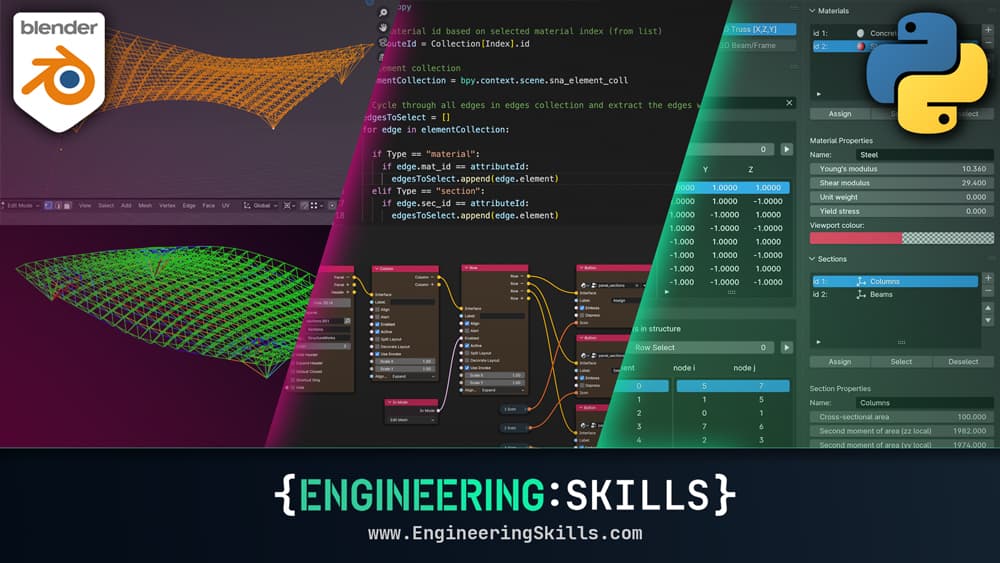
Building Engineering Modelling and Analysis Addons in Blender
Unleash the power of Blender by building custom tools to speed up your workflows
- You’ll be able to build custom logic directly inside Blender and build your own sharable tools in the form of addons.
- You’ll understand how to add custom UI elements such as buttons, menus and panels into the Blender interface.
- You’ll be comfortable using a combination of Serpens, the intuitive and user-friendly node-based development workflow and custom scripting to develop your addons.
- You’ll understand how to implement custom analysis code in your addon and leverage Blender’s 3D capabilities for modelling and visualising structural behaviour.
In this course, you’ll learn how to unlock the enormous potential of Blender as a tool for engineering modelling and analysis. We’ll do this by building our own structural analysis addon!
Blender is a fantastic all-round 3D modelling tool. Although traditionally used by 3D artists, it’s gaining a dedicated following among the Architecture, Engineering and Construction (AEC) community…and for good reason!
Over the years, Blender has popped up in various EngineeringSkills courses (here and here, for example) as a structural modelling and visualisation tool.
Now, we’re going to take the next step and build a custom addon that allows us to do the modelling AND analysis inside Blender. Along the way, we’ll streamline the workflow by building a user interface perfectly suited to our needs.
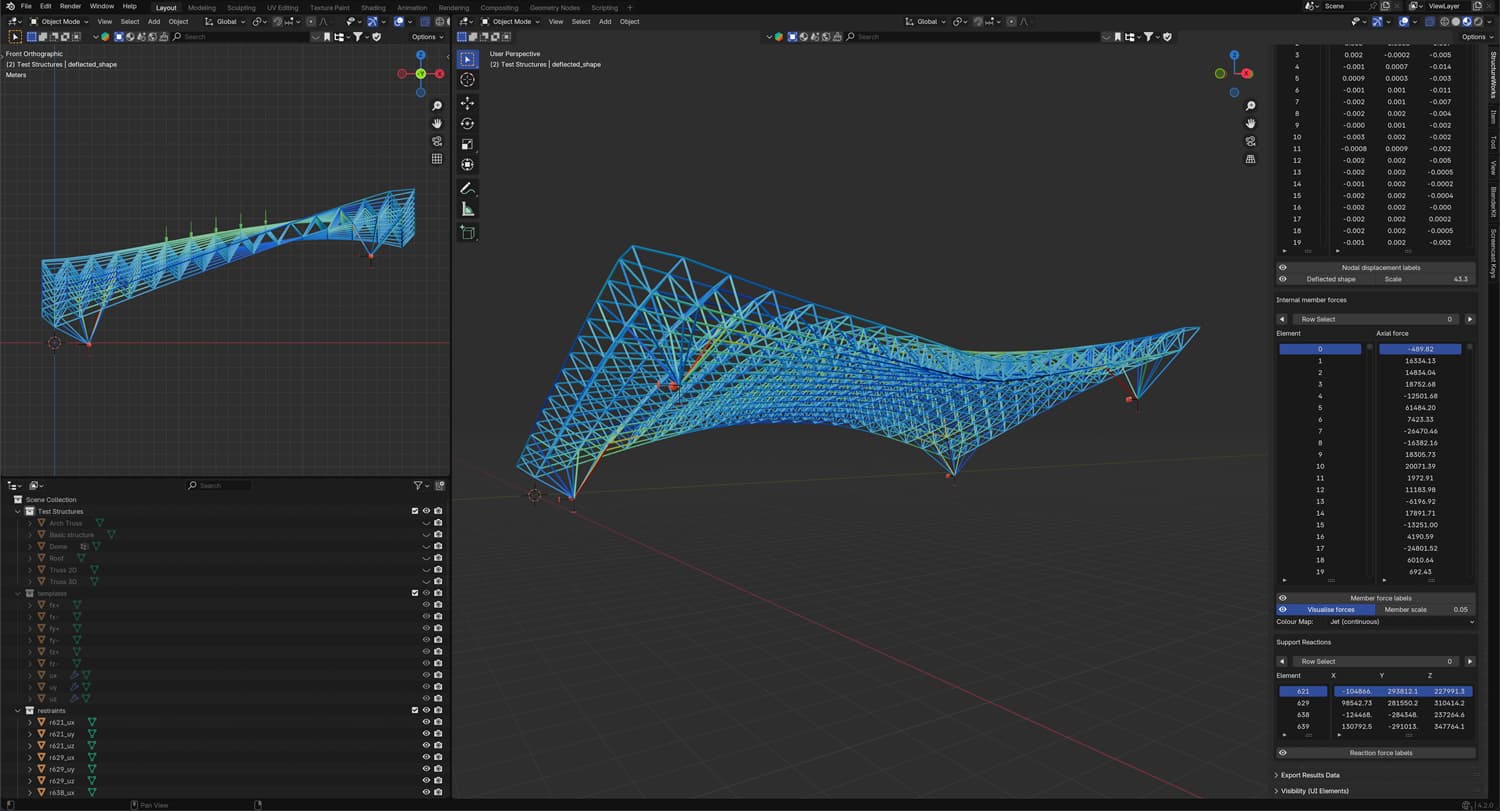
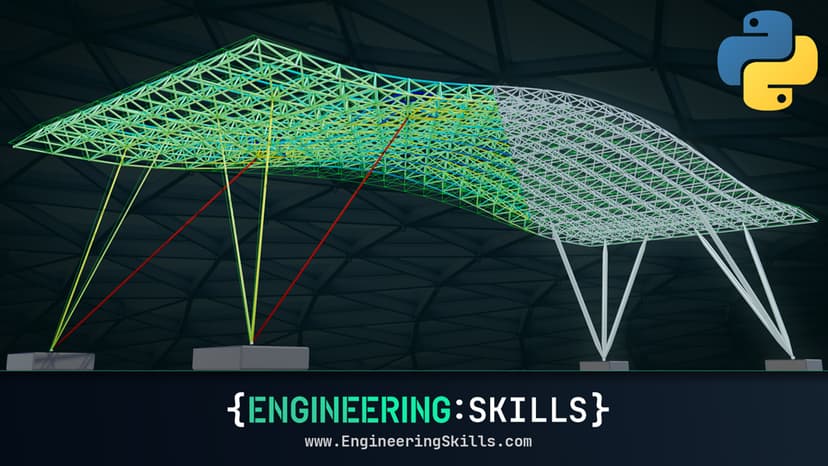
Axial force analysis of a spaceframe roof using StructureWorks.
If you purchase this course, you will also receive a complete version of the StructureWorks addon. In addition, you will receive all future updates to the addon as it undergoes further development by the EngineeringSkills team.
To download the current version of the addon, after enroling in the course, head over to the StructureWorks page and hit 'Download'.
Lifetime and annual subscribers (while subscribed) will also have full access to the addon and all future updates.
Blender Addons
Blender addons are a great way of extending the functionality of Blender. They can take the form of simple tools that help speed up your workflow, all the way up to tools that add massive additional functionality to the software.
The Blender community have been making custom addons for Blender for years. In fact, there’s a thriving marketplace where addon developers distribute and sell their creations. You’ll find addons there that add all manner of additional functionality to Blender.
Why bother learning to make addons now??
Until relatively recently, building an addon for Blender was a much more involved task that required the developer to engage much more deeply with Blender’s Python API. If you’re a Python developer and have the time to really immerse yourself in the API - the world of addons was always wide open for you.
But for the average Engineer or Architect (basically, anyone who was not a Python developer with time to burn), the pain of getting started or the 'barrier to entry' was just too high to bother.
Joshua Knauber and Serpens
That all changed when Joshua Knauber released Serpens in 2020. Serpens is itself an addon for Blender - it’s an addon that allows you to build addons by using node-based scripting. It’s no overstatement to say that the release of Serpens (a $24 addon 🤯) has crushed the barrier to entry when it comes to making your own addons!
Serpens is under active development - currently on version 3 with v4 in the works, and has since developed its own active and supportive community. More on that inside the course.
So, with the pain factor of building your own addons dramatically reduced and the increasing adoption of Blender into AEC workflows - there has never been a better time to learn how to build your own custom tools inside Blender! That’s where this course comes in!
This course will teach you how to use Serpens, in combination with custom scripting using Blender’s Python API to develop V1 of the StructureWorks addon - a tool for the modelling and analysis of 2D and 3D truss structures.
You will need to purchase the Serpens addon separately from the Blender Marketplace in order to complete this course. It is currently only $24 - TBH, it would be a bargain at 10 times that price!
Blender addon development using a combination of Serpens (node-based development) and Blender's Python scripting API.
But I don’t want to build a structural analysis tool
No problem! The big takeaway from this course is absolutely NOT the structural analysis addon you finish with - that’s just a vehicle...a project that lets us build the much more valuable skill of addon development!
I’m a structural engineer - so, for me, most projects usually involve some form of structural analysis…that’s just what I find most engaging! Give me a pen and paper and 10 minutes of idle time, and I’ll be sketching out structures, forces, reactions etc etc…that’s just how I’m wired!
But maybe you’re a mechanical engineer, an architect, a QS or a construction manager. If your work involves building digital representations of the real world, then Blender may fit nicely into your workflow. And if you use Blender, you can almost certainly streamline what you do in Blender by building some custom tools! So, this course will be just as valuable to you!
As we move through the course, if structural analysis isn't your jam, don’t get too hung up on the details of exactly WHAT we’re building, focus on HOW we’re building it and map the techniques to whatever it is you want to build!
Course Breakdown
✅ Section 1: Introduction and Basic Setup
We kick things off by getting our development environment in order. We’ll get Blender and Serpens downloaded and setup, ensuring we’re all using the same versions.
Then we’ll get VS Code (what we'll write our scripts in) setup for working with the Blender. Scripting natively inside Blender is a painful experience when you're used to working with modern code editors, so this is an important step if you want to stay sane while taking this course.
Before we wrap up, I’ll point out some key online resources that you’re going to find helpful while developing with Serpens. There are one or two other content creators out there that do some really heavy lifting when it comes to covering the finer points of Serpens - I’ll point you in their direction.
✅ Section 2: Serpens 101 - The Basics
The focus in section 2 is getting familiar with the very basics of Serpens - how it works, what it can do, and ultimately, how do we get this addon to produce our addon.
We do this by implementing and exporting a minimal example of an addon. By the end of this section, a lot of the questions you’re currently asking yourself about Serpens and the development workflow will be wiped away.
✅ Section 3: Itemising structure elements and nodes
In this section, we’ll build the functionality for our addon to extract the list of nodes and elements from our candidate wireframe mesh.
The humble mesh object is the basis of our structural model so breaking up into nodes and elements that our analysis code understands is critical. This will also expose us to some helpful new techniques around list building and display in Serpens.
✅ Section 4: Building the Materials Library
In section 4, we'll start building the material library which allows us to specify and store various structural materials.
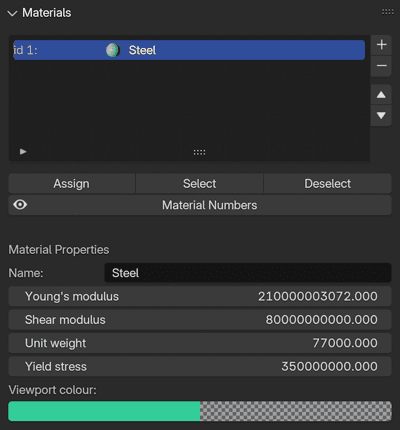
Structural materials library.
This will introduce us to the core of how we’ll be Creating, Reading, Updating and Destroying (CRUD operations) user-generated data in our addon. What we learn in section 4 will be used extensively throughout the course.
✅ Section 5: Building the Sections Library
This section will re-implement the core functionality we saw in the previous section - this time, our focus is on building a library to hold all of the user-defined cross-sections.
In sections 3, 4 and 5 we’ll make extensive use of the Serpens’ Function nodes. These are one of our core building blocks and a great way of encapsulating and re-using node groups across our addon.
We’ll also establish a workflow for integrating custom Python scripts and keeping track of where they’re used in our node setups. This is going to be critical to keeping our addon maintainable as it grows.
✅ Section 6: The Restraint Management Panel
In section 6, we build on what we did in sections 4 and 5 and start adding user-generated data that relates directly to active selections in the 3D view. Having a way to intuitively select parts of our structure in the 3D view and then assign attributes based on the selection is critical. Our first task will be selecting nodes and assigning nodal restraints.
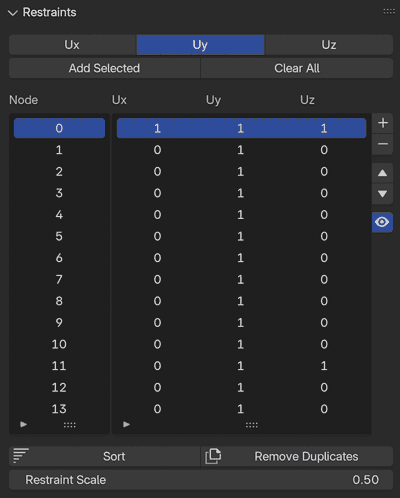
Restraint management panel.
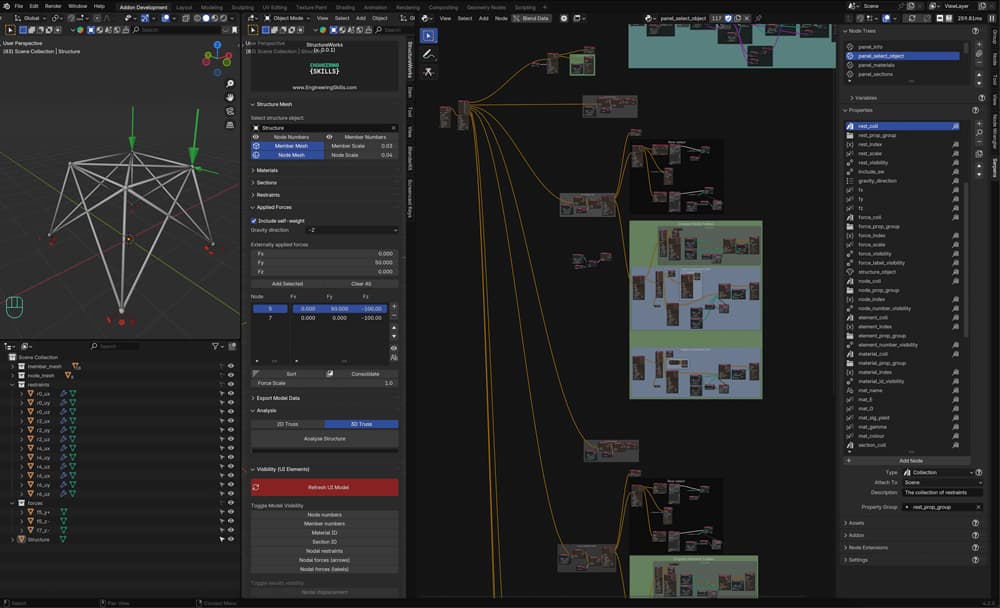
✅ Section 7: The Applied Forces Panel
In section 7, we’ll lean on a lot of what we covered in section 6, but this time, we’ll be applying forces to the selected nodes. In sections 6 and 7, we'll also be implementing some functionality to manipulate the properties we’ve assigned to nodes, e.g. removing duplicate restraints, consolidating forces on each node and sorting the data.
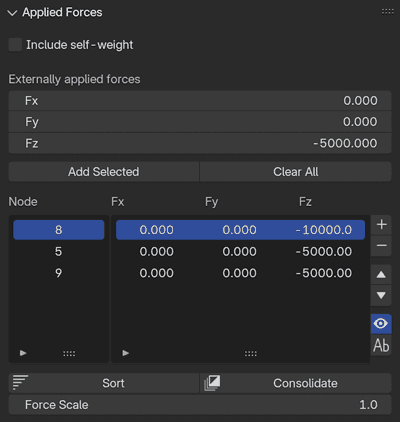
Applied forces panel.
✅ Section 8: Adding Custom Mesh Assets to the Scene
Up to this point, we’ve generated new data and assigned attributes to parts of the structure - but there’s no visual representation of this in the 3D view.
This changes in section 8 when we cover the next big milestone - bringing custom geometry assets into the scene and assigning them based on our user-generated data.
We’ll generate some basic mesh objects to represent forces and restraints and then assign these as assets to be bundled with our addon. We can then use them as we like - in our case, to represent the assigned restraints and applied forces.
✅ Section 9: Implementing 3D Truss Analysis
In section 9, we’ll build the engine that drives our addon - the structural analysis script. We’re going to be implementing the solver that we developed in this course for 3D truss analysis. We’ll make some modifications, but the bones of it will be what we covered previously.
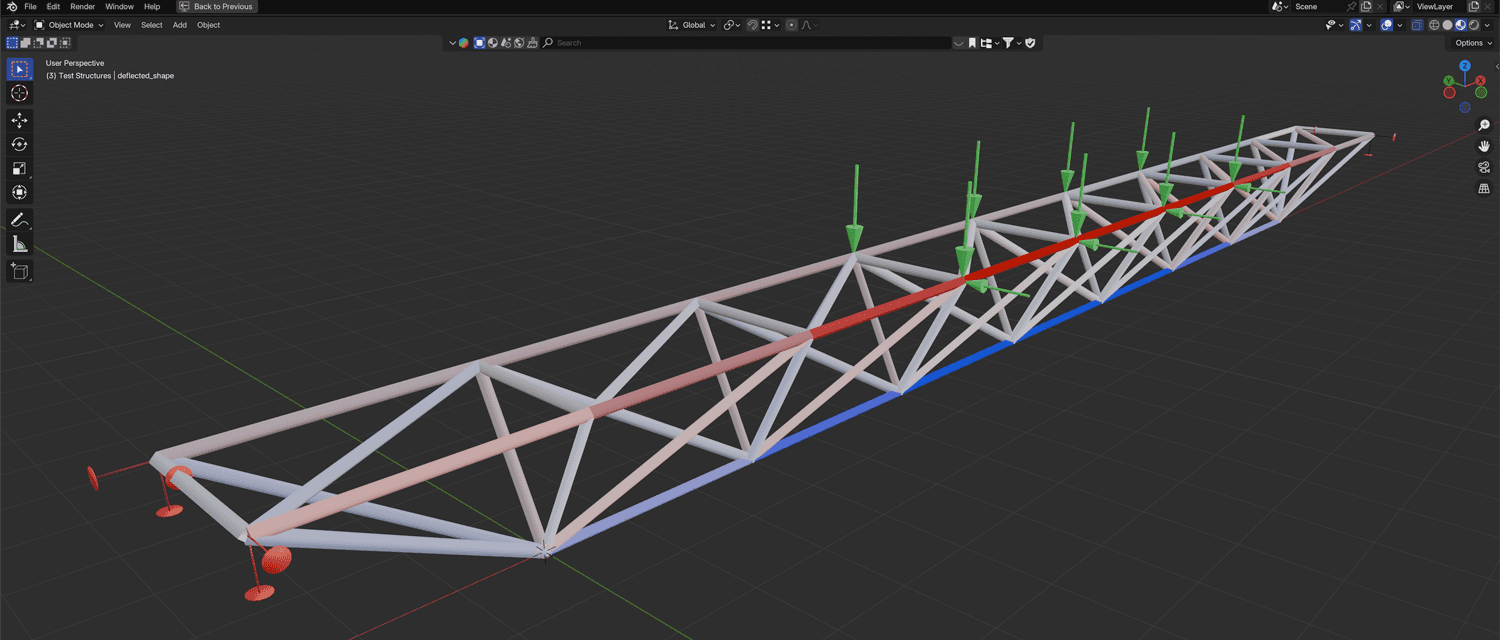
3D truss analysis.
I won’t go through the theory in any great detail in this course - if you want a deep dive on this, head over to the original spaceframe analysis course.
You can get both courses as a discounted course bundle - check out the course bundles page, or scroll to the bottom of this page for details.
That said, you should be able to follow along with the basics of what the script is doing if you’re familiar with matrix-based analysis methods. I'll give a high-ish level running commentary of the analysis script as we go.
If you’re not an engineer and have no idea (and are not interested in) what I’m talking about when I say matrix-based analysis - you can blindly copy me here - all I’m doing is taking the user inputs, passing them through a black box and getting the desired outputs. Just imagine swapping this step out for whatever analysis you want as the basis of your own addon.
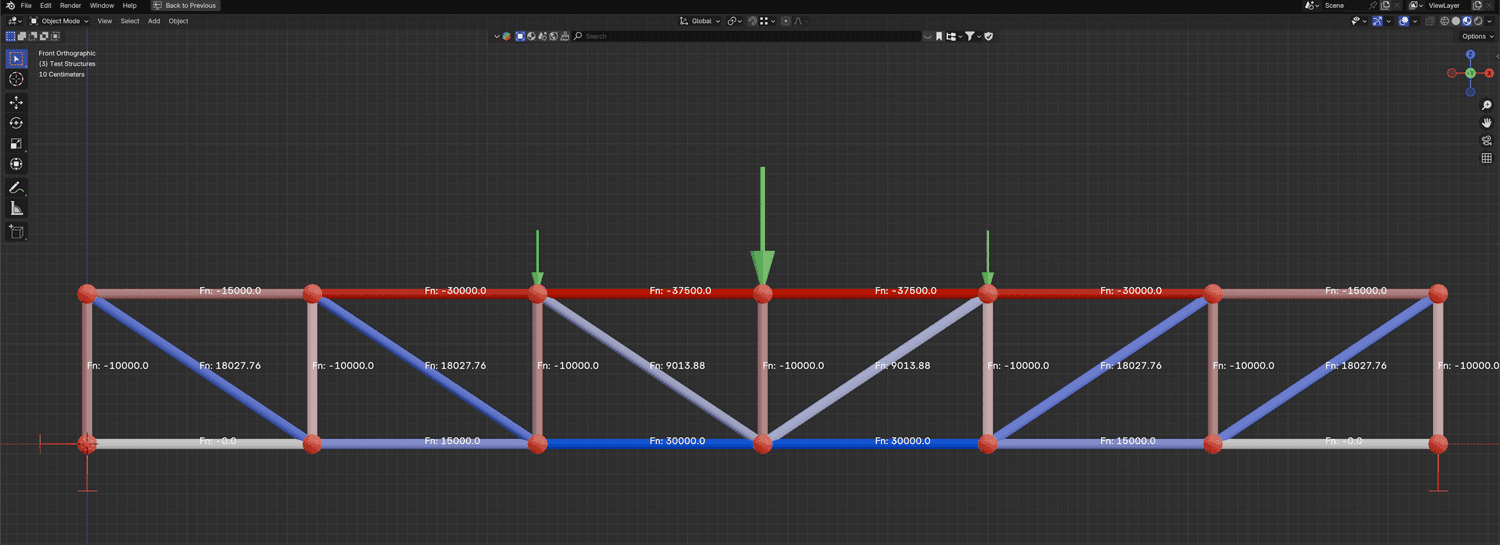
✅ Section 10: Building Data Tables and a Deflected Shape
With all of the results calculated, we need some way of seeing them! We’ll start by building our results analysis tables in section 10. What we cover here is going to be handy in any addon where tables of data are generated - so almost all engineering-focused addons! Then, we can turn our attention to visualising results in the 3D viewport. The easiest set of results to tackle first is the deflected shape. We’ll also build in a handy scale slider that allows us to exaggerate the deflection to help get a more intuitive ‘feel’ for what the structure wants to do under load.
✅ Section 11: Exporting Data
Our next step is to work out a way of getting all of this data out of Blender and into a .csv file. We’ll break this into two operations: (i) exporting all of the data that defines the structure and loading - the problem definition, and (ii) exporting all of the results data.
✅ Section 12: Adding Text Labels to the 3D View
In section 12, we add another essential feature, the ability to print labels in the 3D viewport. This will introduce us to another set of Serpen’s nodes - modal nodes. This unlocks a lot of quality-of-life improvements in our addon, e.g. adding node numbers, materials numbers, force labels, nodal deflection labels. These labels are going to be a key bridge between the results we see in our results tables and the 3D structural model.
✅ Section 13: Auto-generating the Element and Node Mesh
Section 13 sees us cover another big milestone in our addon development - procedural mesh generation. Our structural model thus far is a simple wireframe consisting of Blender’s native vertex and edge primitives. In this section, we’ll use this data to build a mesh representation of each node and edge. This is an important building block for the generation of results heatmaps that come later.
We covered a version of this at the end of the previously mentioned Spaceframe course. However, this time around, we’ll be taking a different approach that frees us from some of the performance bottlenecks we ran into previously.
✅ Section 14: Implementing Axial Force Heatmaps
Building on the procedural mesh generation covered in section 13, in section 14, we implement a custom material that we can apply to our mesh. The trick here is to generate colours based on the axial force recorded for each element and apply this colour to the mesh faces associated with that element. Again, we’re taking a different, more performant approach to this than what we covered when we did this previously.
Axial force heatmap.
The key takeaway here is the generation of a custom material with colours assigned based on attributes, axial force in this case. Once you understand the workflow, you can generate additional heatmaps based on any attribute, e.g. axial stress, buckling failure, tension failure - whatever you like.
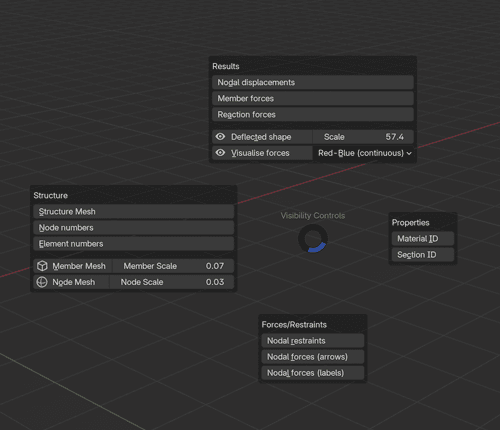
✅ Section 15: Building the UI Control Panel
At this point in the course, the hardest tasks are behind us. Now it’s just about adding polish and quality-of-life improvements…it’s all downhill from here!
In this section, we’ll collect all of the functionality relating to the UI into one place and build a UI control panel. This will be where we can go to switch on or off any UI element, e.g. mesh representation, deflected shape, results heatmaps, labels etc.
✅ Section 16: Adding a Pie-Menu for Quick UI Control
A pie-menu is a menu that we can invoke with a keyboard hotkey directly inside the 3D view. If you’ve watched any of the demo videos for this course, you’ll have seen me invoke a menu that appears in the centre of the screen - this is a pie-menu, and we’ll build it in section 16.
Custom pie-menu.
Pie-menu’s are really handy for quickly accessing functionality. We’ll build one that essentially duplicates the UI control panel we built in the previous section. This pie-menu is actually what I find myself using 99% of the time once my model has been set up and I want to start exploring the results in the 3D view.
Pie-menu’s are easy to build and you can build them to access whatever functionality you like.
Who is this course for?
- Architecture, Engineering and Construction (AEC) professionals who want to learn how to build custom tools in Blender to streamline their workflows.
- Engineers who want to leverage the 3D capabilities of Blender for modelling and visualising structural behaviour.
- Non-AEC folks (e.g. artists, 3D hobbyists and general Blender users) who want to learn how to build custom tools using Serpens (and are willing to put up with a little structural engineering along the way 😉).

Download your personalised Certificate of Completion once you’ve finished all course lectures.
Applying for jobs? Use your Certificate of Completion to show prospective employers what you’ve been doing to improve your capabilities.
Independently completing an online course is an achievement. Let people know about it by posting your Certificate of Completion on your Linkedin profile or workplace CPD portfolio.

The Structural Analysis Blender Addon Course Bundle
The structural analysis theory and practical development skills needed to build a complete analysis addon for Blender.
- 3D Space Frame Analysis using Python and Blender
- Building Engineering Modelling and Analysis Addons in Blender