An Introduction to the ETABS Python API - Automate Repetitive Analysis Tasks
![[object Object]](/_next/image?url=%2Fimages%2Fauthors%2Fhakan_keskin.jpg&w=256&q=75)
In this tutorial, Hakan Keskin gives us a comprehensive introduction to using Python to interact with the ETABS API.
Production-level full-building models can become very large, often containing thousands of elements, connections, loads and combinations. Managing all of this data manually can quickly become a huge headache. This is where an API becomes incredibly valuable! By using Python to interact with ETABS programmatically, you can automate repetitive tasks, run analyses, and extract results from your ETABS models. This is a fantastic way to streamline your workflow and enhance your productivity.
If you're an ETABS user, you should find this tutorial really helpful. In fact, even if you're not an ETABS user, hopefully, this tutorial will give you some ideas on how you can use Python to interact with other design and analysis software.
When I pick up a new piece of software (admittedly, a fairly rare occurrence these days), one of the first things I check for is whether or not it has a Python API. In today's engineering world, this is table stakes for me! If this is something you've not yet explored in your own workflow, I'd highly recommend taking an afternoon to investigate further.
So, with that brief introduction, I'll let Hakan take it from here - enjoy.

1.0 Why Use Python with the ETABS API?
When working on repetitive structural analysis and design tasks in ETABS, you might find yourself spending hours creating similar models, running analyses, and exporting results manually. The good news is that ETABS offers an Application Programming Interface (API) that allows you to automate these tasks. Even better, you can control this API using Python.
In this tutorial, we will cover how you can use Python to interact with the ETABS API. We will:
- Launch and connect to an existing ETABS model via Python.
- Run a structural analysis programmatically.
- Extract analysis results, such as internal forces for columns and beams under multiple load combinations.
Whether you are a beginner or an experienced engineer, this tutorial will give you a solid foundation to automate your workflow and enhance your productivity using Python with the ETABS API.
Before diving into practical steps, let’s look at some of the benefits of using the ETABS API:
-
Automate Repetitive Tasks:
Many tasks in structural analysis are repetitive, such as creating models, applying loads, running analyses, and exporting results. Using Python, you can automate these processes and save significant time. -
Efficient Database Updates:
You can quickly update sections, materials, geometries, or loads using Python. Instead of updating each table manually in ETABS, Python allows you to use loops and condition-based scripts to handle multiple scenarios at once. -
Time Optimisation and Advanced Analysis:
Running analyses and extracting results manually can take hours. Python scripts can perform the same tasks in seconds, allowing you to focus on advanced design and optimisation. -
Integration with Other Software:
Python makes it easy to export ETABS results to other tools, such as connection design software, foundation design tools, or 2D/3D CAD software for further analysis. -
Advanced Customisation and Property Definition:
You can define advanced properties, such as plastic hinges and perform complex analyses that would be tedious to set up manually in ETABS.
1.1 Prerequisites
Before you begin, make sure you have the following:
- ETABS installed on your computer.
- Python 3.x installed, along with essential libraries such as
comtypes,numpy, andpandas. - Basic knowledge of Python is also going to come in handy.
2.0 Accessing an Existing ETABS Model with Python
The first step is to access an existing ETABS model using Python. This allows you to interact with the model directly, whether it’s to run an analysis, update properties, or extract results. To achieve this, we will use the comtypes library, which allows Python to communicate with COM-based applications like ETABS.
In this step, you’ll learn how to:
- Install and set up the required Python libraries.
- Create an ETABS object using Python.
- Open an existing
.edbmodel file and verify the connection.
2.1 Installing required libraries
Before starting, ensure that you have Python 3 installed on your system. You’ll also need the following Python libraries:
comtypes: To communicate with the ETABS API.pandas: For handling and organising extracted data.openpyxl: For exporting results to Excel.
You can install all required libraries using pip. Open your terminal or command prompt and run the following commands:
pip install comtypes pandas openpyxl os
2.2 Creating an ETABS object and opening a model
The ETABS API provides a way to control ETABS through Python. You need to create an ETABS object and connect it to an existing ETABS model file. Here’s how you can do it:
import comtypes.client
import os

ModelPath =r"C:\Users\path\modal_name.edb"

if not os.path.exists(ModelPath):
    os.makedirs(ModelPath)

# Create API helper object

helper = comtypes.client.CreateObject('ETABSv1.Helper')
helper = helper.QueryInterface(comtypes.gen.ETABSv1.cHelper)

EtabsObject = helper.CreateObjectProgID("CSI.ETABS.API.ETABSObject")

# Start ETABS application
EtabsObject.ApplicationStart()

# Create SapModel object
SapModel = EtabsObject.SapModel
SapModel.InitializeNewModel

# Open and save the model
SapModel.File.OpenFile(ModelPath)

print("ETABS model opened successfully!")
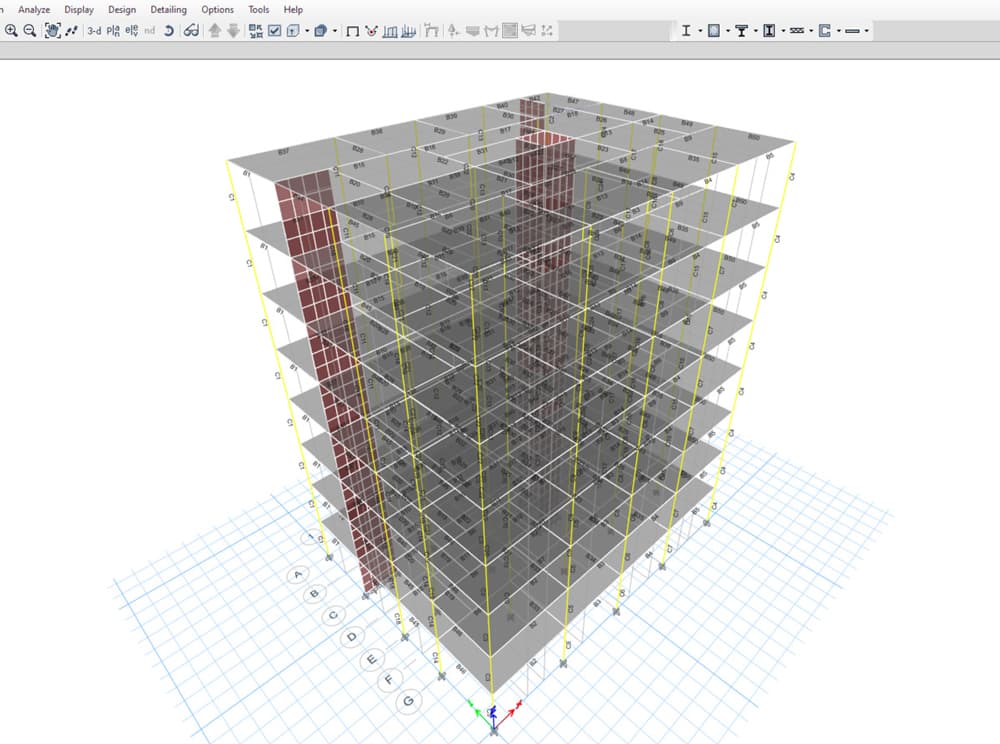
Fig 1. ETABS model opened successfully using Python.
Explanation of the Code
-
helper = comtypes.client.CreateObject('ETABSv1.Helper'): This creates a helper object for initialising the ETABS API. The helper object simplifies the process of creating an instance of the ETABS application. -
helper.QueryInterface(comtypes.gen.ETABSv1.cHelper): This converts the helper object to an interface that provides specific functions for creating and managing ETABS instances. -
EtabsObject = helper.CreateObjectProgID("CSI.ETABS.API.ETABSObject"): This creates the main ETABS object, which serves as the bridge between Python and the ETABS software. -
SapModel.InitializeNewModel: Initialises a new model within ETABS. This step ensures that the model environment is properly set up for the next operations.
Key Notes:
- Ensure the model file path (
ModelPath) is correct and accessible. Incorrect paths will lead to a "File Not Found" error. - If ETABS is not installed or properly licensed, the
ApplicationStart()command will fail to launch ETABS. - Always check that
SapModelis initialised properly before performing any operations on the model.
2.3 Checking the model connection
After opening the model, it’s good practice to verify that the model is loaded correctly. You can check the model’s name and confirm the connection using the following code:
# Get the model's name to verify the connection
ModelName = EtabsObject.SapModel.GetModelFilename()

# Print the model name
print(f"Model loaded: {ModelName}")
Possible Issues and Solutions
- File Not Found: Ensure that the path to your
.edbfile is correct and that the file exists. Use a raw string (r"Path") to avoid issues with backslashes in the path. - ETABS Not Installed or Running: Make sure ETABS is installed and licensed on your system. If ETABS doesn’t start, check your installation and ensure no conflicting versions are running.
In the next step, we’ll learn how to run an analysis on the loaded model and extract useful results.
3.0 Running an Analysis via Python
Once the model is open, you can run the analysis directly from your Python script. Here’s how:
# Save model
SapModel.File.Save(ModelPath)

# Run the analysis
 ret = SapModel.Analyze.RunAnalysis()

if ret == 0:
    print("Analysis completed successfully!")
else:
    print("Analysis failed.")
Explanation of the code:
Analyze.RunAnalysis(): This method runs the analysis for the currently loaded model.ret == 0: Indicates that the analysis was successful.
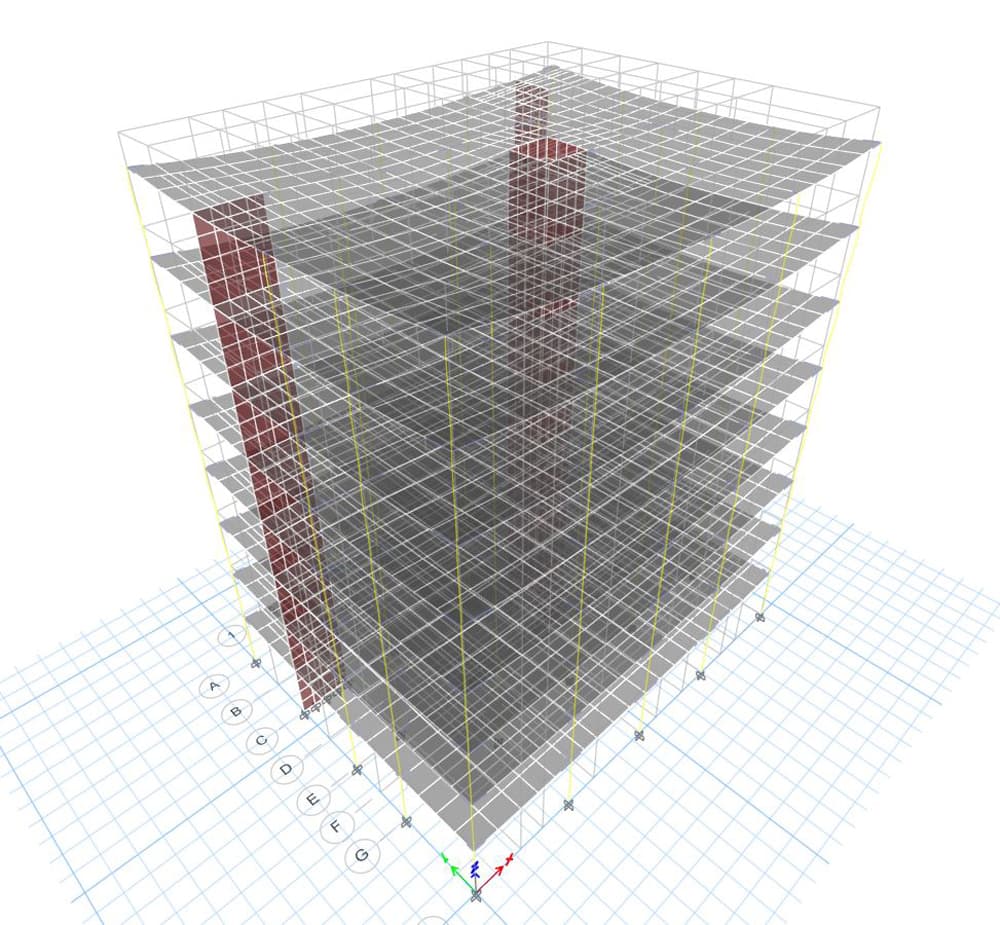
Fig 2. ETABS model results.
4.0 Extracting Analysis Results
Once the analysis is complete, the next step is to extract internal force results for beams and columns. These results include axial forces (P), shear forces (V2, V3), torsion (T), and moments (M2, M3). In this section, we will show how to retrieve these forces for:
- All combinations – Retrieving results for every response combination available in the model.
- Specific combinations – Selecting and extracting results for a user-defined response combination, such as
"G+Q+EY".
We will also combine these results into a pandas DataFrame for easier manipulation and export to Excel.
4.1 Retrieving results for all combinations
The first step is to get a list of all response combinations in the model. This can be done using the SapModel.RespCombo.GetNameList() method, which returns the names of all available combinations. Here’s the Python code:
# Retrieve the list of all response combinations
ret, combinations, ret, cb = SapModel.RespCombo.GetNameList()

# Print all available combinations
print("Available combinations:", combinations)
This outputs:

Fig 3. ETABS model load combinations.
Once we have the combination names, we can set up the results extraction by iterating over all combinations and retrieving the internal forces for each frame element.
4.2 Preparing frame data
Before extracting results, we need to get basic information about the frames (beams and columns) in the model. This ensures we know which elements to target for results extraction.
# Select specific indexes and related column names for frame information
indexes = [1, 2, 3]
related_column_names = ["Frame", "Section Name", "Story"]

# Retrieve all frame information
all_frames_information = SapModel.FrameObj.GetAllFrames()

# Prepare the frame data by selecting relevant columns
prepared_frame_data = [all_frames_information[i] for i in indexes]
frame_data = pd.DataFrame(prepared_frame_data).T
frame_data.columns = related_column_names

# Display the frame data
print(frame_data)
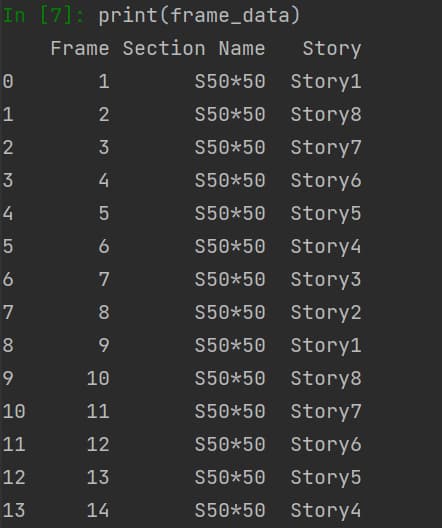
Fig 4. ETABS model data.
4.3 Retrieving results for a specific combination
To retrieve results for a specific response combination (e.g., "G+Q+EY"), we need to set the combination as the output case using SetComboSelectedForOutput():
# Deselect all cases and combinations for output
SapModel.Results.Setup.DeselectAllCasesAndCombosForOutput()

# Set the desired combination for output (e.g., "G+Q+EY")
SapModel.Results.Setup.SetComboSelectedForOutput("G+Q+EY")
Once the combination is set, you can extract the internal forces for each frame element.
4.4 Retrieving results for all combinations
We can loop through each combination and retrieve the internal forces for every frame element. Here’s the code to do that:
# Deselect all cases and combinations for output
SapModel.Results.Setup.DeselectAllCasesAndCombosForOutput()

# Loop through all combinations and retrieve results
for each in list(combinations):
    SapModel.Results.Setup.SetComboSelectedForOutput(each)
You can also use this loop to extract results for all combinations for every frame element.
4.5 Retrieving internal forces for each frame element
We now retrieve the internal forces for all frames and all combinations. The results are collected in a list of individual DataFrames, which are later combined into a single DataFrame for easier handling.
all_results = []  # Create an empty list to store individual DataFrames

for each in frame_data.Frame:
    # Set units to kN-m
    SapModel.SetPresentUnits(6)

    # Define indices and column names
    selected_indices = [1, 2, 5, 6, 8, 9, 10, 11, 12, 13]
    column_names = ["Frame", "Section Point", "Case", "Max-Min", "P", "V2", "V3", "T", "M2", "M3"]

    # Retrieve results for the current frame
    frame_results = SapModel.Results.FrameForce(each, 0)

    # Extract only relevant data
    data = [frame_results[i] for i in selected_indices]

    # Convert to a DataFrame and transpose it
    results_df = pd.DataFrame(data).T
    results_df.columns = column_names

    # Add to the list of results
    all_results.append(results_df)

# Combine all individual DataFrames into a single DataFrame
final_frame_forces_df = pd.concat(all_results, ignore_index=True)

# Display the final DataFrame
print(final_frame_forces_df)

# Combine all individual DataFrames into a single DataFrame
final_frame_forces_df = pd.concat(all_results, ignore_index=True)

# Display the final DataFrame
print(final_frame_forces_df)
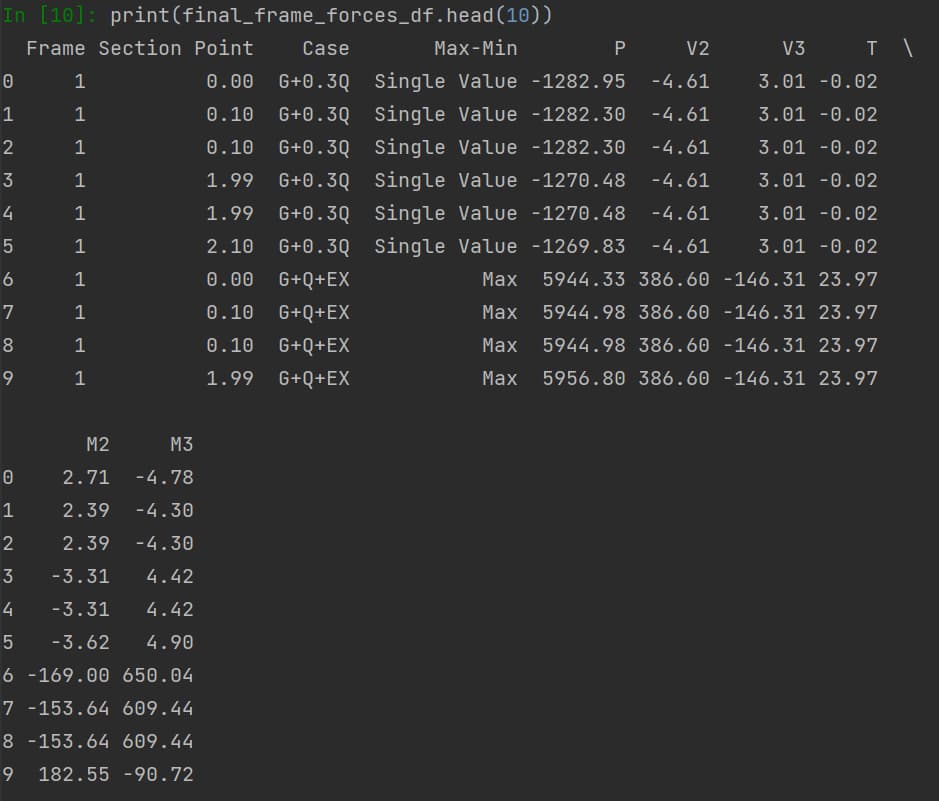
Fig 5. Analysis results.
Explanation of the Code:
SapModel.SetPresentUnits(6): Sets the output units to kNm. This ensures consistent units for all extracted results.SapModel.Results.FrameForce(each, 0): Retrieves the internal forces for the current frame element (each) for the selected combination.selected_indices = [1, 2, 5, 6, 8, 9, 10, 11, 12, 13]: These are the indices of the relevant result data (frame name, section point, load case, and internal forces).pd.DataFrame(data).T: Converts the extracted data into a pandas DataFrame and transposes it for easier manipulation.pd.concat(all_results, ignore_index=True): Combines all individual DataFrames into a single DataFrame for the final output.
5. Extracting Base Reactions
Base reactions are critical results in structural analysis. They provide the forces and moments at the supports, which can be used for designing foundations or base plates in steel structures. The ETABS API allows you to extract these reactions for all response combinations and organise them into a pandas DataFrame for further use.
In this step, we will:
- Set up the results for base reaction extraction.
- Loop through all combinations and retrieve base reactions.
- Convert the extracted results into a pandas DataFrame.
These results can then be exported and used for further design checks, such as foundation sizing or base plate design for steel structures.
5.1 Preparing to extract base reactions
Before extracting the base reactions, we must first deselect all load cases and response combinations and then select the desired combination for output. Here’s the initial setup:
# Deselect all cases and combinations for output
SapModel.Results.Setup.DeselectAllCasesAndCombosForOutput()

# Loop through all combinations and select them
for output for each in list(combinations):
	SapModel.Results.Setup.SetComboSelectedForOutput(each)

# Set units to kN and m
SapModel.SetPresentUnits(6)
Explanation of the code:
DeselectAllCasesAndCombosForOutput(): Clears all selected cases and combinations to ensure that only the desired combinations are selected for output.SetComboSelectedForOutput(each): Iterates through all response combinations and selects them for output. This allows us to retrieve base reactions for all combinations.SetPresentUnits(6): Sets the units to kN and meters for consistency in the extracted results.
5.2 Extracting base reactions
# Define indices and column names
selected_indices = [1, 2, 4, 5, 6, 7, 8, 9]
column_names = ["Case", "Max-Min", "FX", "FY", "FZ", "MX", "MY", "MZ"]

# Retrieve base reactions
base_reactions = SapModel.Results.BaseReact()

# Extract only relevant data
data = [base_reactions[i] for i in selected_indices]

# Convert to a DataFrame and transpose it
results_df = pd.DataFrame(data).T
results_df.columns = column_names

# Display the results
print(results_df)
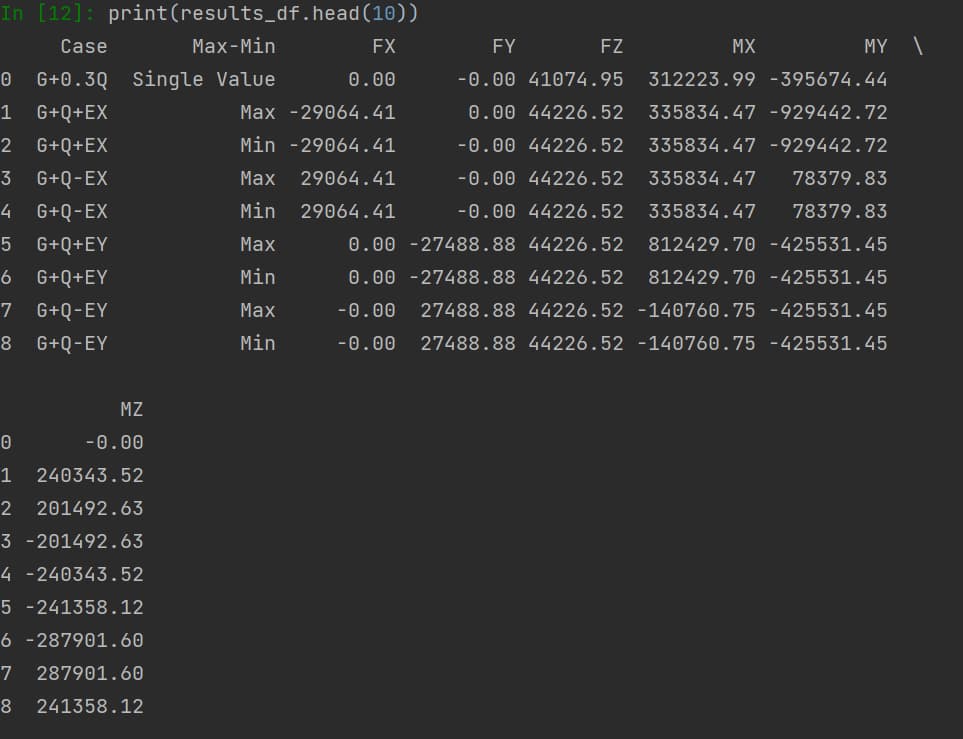
Fig 6. Base reactions.
Explanation of the Code
SapModel.Results.BaseReact(): This method retrieves base reactions for the selected combinations. It returns multiple arrays containing information about the load case, force components (FX, FY, FZ), and moment components (MX, MY, MZ).selected_indices = [1, 2, 4, 5, 6, 7, 8, 9]: These indices correspond to the relevant data fields in theBaseReact()output.pd.DataFrame(data).T: Converts the extracted data into a pandas DataFrame and transposes it for easier manipulation.results_df.columns = column_names: Assigns descriptive column names to the DataFrame.
5.3 Application of base reactions
The extracted base reactions are crucial for structural design. Here’s how you can use them:
- Foundation Design: Use the vertical forces (FZ) and moments (MX, MY) to size footings and check for stability (overturning, sliding, and bearing capacity).
- Base Plate Design for Steel Structures: The horizontal forces (FX, FY) and moments (MX, MY) are key inputs for designing base plates, including checking bolt capacities and plate thicknesses.
- Seismic Analysis: Analyse the lateral reactions (FX, FY) for seismic load evaluation and ensure the foundation system can withstand earthquake forces.
6. Extracting All Joint Coordinates
In structural analysis, having the coordinates of all joints (nodes) in a model is crucial for understanding the geometry and for integrating with other design tools. The ETABS API allows you to extract these joint coordinates programmatically using SapModel.PointObj.GetAllPoints().
In this step, we will retrieve the coordinates for all joints in the model and convert the data into a structured pandas DataFrame for easy access and manipulation.
6.1 Retrieving all joint coordinates
The method SapModel.PointObj.GetAllPoints() returns information about all the joints (nodes) in the model, including their labels and coordinates (X, Y, Z). Here’s the code to retrieve and organise this information:
# Retrieve all joint information
all_joint_informations = SapModel.PointObj.GetAllPoints()

# Define the indices and related column names for joint coordinates
indexes = [1, 2, 3, 4]
related_column_names = ["Joint", "X - Coordinate [m]", "Y - Coordinate [m]", "Z - Coordinate [m]"]

# Prepare the joint data by selecting the relevant columns
prepared_joint_data = [all_joint_informations[i] for i in indexes]

# Convert the joint data to a pandas DataFrame and transpose it
joint_data = pd.DataFrame(prepared_joint_data).T
joint_data.columns = related_column_names # Display the joint data print(joint_data)
Explanation of the Code
SapModel.PointObj.GetAllPoints(): This method retrieves all joint information in the model, including the joint labels and their corresponding X, Y, and Z coordinates.indexes = [1, 2, 3, 4]: These indices correspond to the relevant fields in theGetAllPoints()output, representing the joint label and X, Y, and Z coordinates.related_column_names: Defines the column names for the resulting DataFrame for clarity and ease of use.pd.DataFrame(prepared_joint_data).T: Converts the selected joint information into a pandas DataFrame and transposes it to organise the data in rows and columns.joint_data.columns = related_column_names: Assigns column names to the DataFrame for better readability.
6.2 Practical applications of joint coordinates
The joint coordinates can be used for a variety of purposes in structural engineering:
- Model Visualisation: Generate 3D plots of the structure to visualise its geometry and check for errors in node positioning.
- Data Export for CAD Integration: Export the joint coordinates to CAD or 3D modelling software for creating detailed design drawings.
7. Saving All Outputs to Excel
In the previous steps, we extracted various outputs from the ETABS model, including:
- Frame Internal Forces for beams and columns under specific and all combinations.
- Base Reactions for foundation and base plate design.
- Joint Coordinates for understanding the model geometry and integration with other tools.
Now, we will show how to export all these outputs to Excel files for further processing, reporting, or integration with other software. This step ensures you can easily share the results.
7.1 Saving frame internal forces
We have already collected all frame internal forces in a pandas DataFrame called final_frame_forces_df. Here’s how to save it to an Excel file:
# Export frame internal forces to an Excel file
final_frame_forces_df.to_excel("FrameForcesResults.xlsx", index=False)
print("Frame internal forces exported to FrameForcesResults.xlsx")
7.2 Saving base reactions
The base reaction data is stored in a pandas DataFrame called results_df. To save it as an Excel file, use the following code:
# Export base reactions to an Excel file
results_df.to_excel("BaseReactions.xlsx", index=False)
print("Base reactions exported to BaseReactions.xlsx")
7.3 Saving joint coordinates
The joint coordinates are stored in a pandas DataFrame called joint_data. Here’s how to export it:
# Export joint coordinates to an Excel file
joint_data.to_excel("JointCoordinates.xlsx", index=False)
print("Joint coordinates exported to JointCoordinates.xlsx")
7.4 Combining multiple outputs into a single Excel file (optional)
If you want to combine all outputs into a single Excel file with multiple sheets, you can use pandas.ExcelWriter():
with pd.ExcelWriter("ETABS_Results.xlsx") as writer:
    final_frame_forces_df.to_excel(writer, sheet_name="Frame Forces", index=False)
    results_df.to_excel(writer, sheet_name="Base Reactions", index=False)
    joint_data.to_excel(writer, sheet_name="Joint Coordinates", index=False)

print("All outputs exported to ETABS_Results.xlsx")
Explanation:
pd.ExcelWriter(): This creates an Excel file with multiple sheets.to_excel(writer, sheet_name="..."): Specifies the name of each sheet for the corresponding DataFrame.index=False: Omits the default index column in the exported Excel file for a cleaner presentation.
8.0 Conclusion and Future Ideas
In this article, we explored how to use Python with the ETABS API to automate structural analysis tasks, extract results, and integrate with external tools. We started from the basics and covered:
- Accessing an existing ETABS model: Connecting to ETABS, opening an existing
.edbmodel, and preparing it for analysis. - Running an analysis via python: Automating the analysis process using Python.
- Extracting analysis results: Retrieving internal forces for beams and columns under specific and all combinations, organising them into pandas DataFrames.
- Extracting base reactions: Obtaining base reactions for foundation and base plate design.
- Retrieving joint coordinates: Collecting the X, Y, and Z coordinates of all joints in the model for geometry validation and CAD integration.
- Saving results to Excel: Exporting all outputs (internal forces, base reactions, and joint coordinates) to Excel files for further processing and reporting.
Other ideas to explore:
This is really only scratching the surface of what we can do with the ETABS API and Python. Here are some additional ideas to explore:
- Parametric Modelling with Python: Automatically generating and modifying complex models using loops and conditions in Python.
- Optimisation Techniques: Using Python to optimise the structural design by iterating through multiple configurations and selecting the most efficient one.
- Integration with Other Tools: Connecting ETABS outputs to tools for connection design, foundation design, or 3D CAD modelling.
- Nonlinear and Time-History Analysis: Automating advanced analyses that are difficult to perform manually in ETABS.
These advanced topics will help you become even more efficient in your structural analysis and design workflow, saving time and ensuring accuracy. Stay tuned for more tutorials on these topics!

Featured Tutorials and Guides
If you found this tutorial helpful, you might enjoy some of these other tutorials.

A Pynite Crash Course - Open Source Finite Element Modelling for Structural Engineers
Part 1 - Get hands-on with V1.0 of this exciting new Python FEA library

Dan Ki

Building a Beam Deflection Calculator in Python
Build a beam deflection calculator in Python by numerically integrating the bending moment diagram

Dr Seán Carroll

Simulating crowd vibrations using the Duhamel Integral
Learn about the Duhamel Integral & how it can be used to simulate crowd-induced vibrations in Python
Dr Seán Carroll