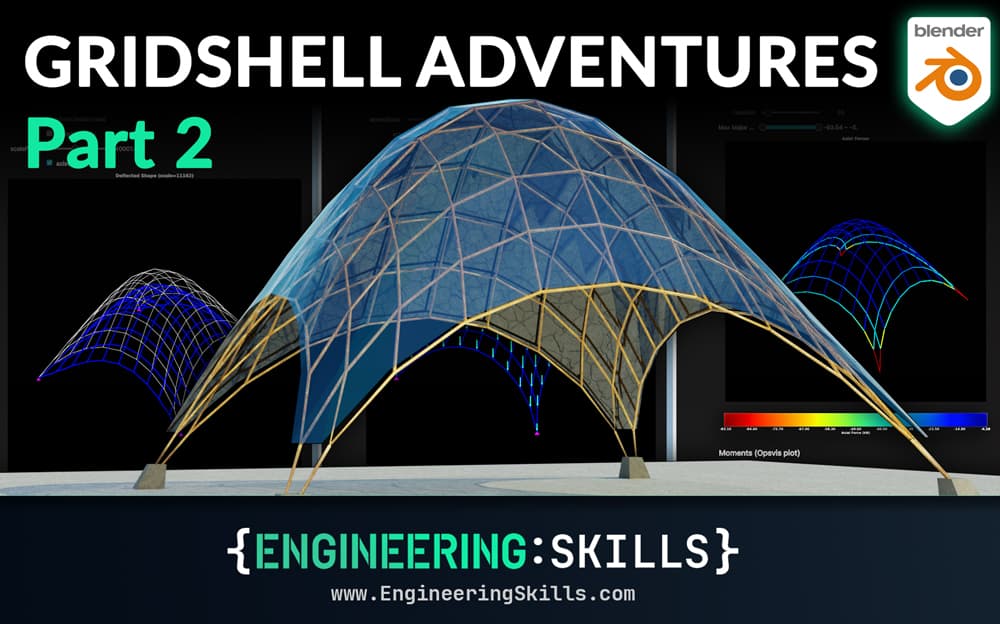
Gridshell form finding and analysis with Blender and OpenSeesPy
![[object Object]](/_next/image?url=%2Fimages%2Fauthors%2Fsean_carroll.png&w=256&q=75)
This is part 2 of our gridshell analysis series. Before continuing with this tutorial, it would be a good idea to review part 1, A primer on the form and behaviour of gridshell structures.
In this tutorial, we'll build a workflow that allows us to digitally re-create the classic hanging chain form finding models, (Fig 1) used to identify the optimal shapes of gridshell structures.

Fig 1. Suspended (shown inverted) chain model studies of the Berkeley gridshell [1].
In later parts of this series, we’ll explore numerical techniques in Python to achieve this but for now, we’ll use Blender for 3D modelling and form finding simulation. This is an easy and remarkably effective way to ‘digitally hang’ our chains models.
Once a funicular geometry has been identified, we’ll use OpenSeesPy to evaluate the stresses developed within the form-found structure. Although our focus in this tutorial is on gridshell structures and the form finding process, the OpenSeesPy code we develop is easily applied to the analysis of general 3D frame structures.
Those looking for sample code for 3D OpenSeesPy models should find this particularly helpful. For such a widely used piece of software, online code examples are remarkably thin in the ground!
For brevity, we won’t cover every single line of code written in the accompanying Jupyter Notebook (we’ll skim over plotting code for example) - but if you want to download the complete Jupyter Notebook and Blender file, just log in and if you’re an EngineeringSkills member, you’ll be able to download all resources.
This is quite a long and detailed tutorial - so here's a quick roadmap of what to expect. We'll break the project down into the following sections:
1.0 Introduction - The Unstrained Gridshell
In this section, we'll quickly review what exactly we mean by the term 'unstrained gridshell'. This will be a very quick recap of a couple of concepts we covered in part 1 of this series.
2.0 The Digital Hanging Chain Model
Next, we work our way through building a digital hanging chain model in Blender. Using Blender's Physics simulation engine, we can quickly generate hanging chain geometry that will act as our starting point for structural analysis. We'll also work on exporting this geometry so we can plug it into OpenSeesPy.
3.0 Notebook Setup and Data Import
In this section, we'll set up our Jupyter Notebook and import the data we need to get started. We'll also build a 3D visualisation of our structure using matplotlib to confirm that our data import has been successful.
4.0 3D Frame Analysis in OpenSeesPy
This is where we get into the meat of the project and build the structural analysis pipeline using OpenSeesPy. We'll start by defining the structural model, then evaluate the nodal loading due to self-weight, and then run our structural analysis. We'll build various structure visualisations to act as confirmation that our OpenSeesPy model is coming together correctly.
Once our gridshell structure has been successfully solved, we'll build more visualisations to help us visualise and interpret the structure's behaviour. The code we write in this section will generalise nicely to any 3D frame structure you need to analyse with OpenSeesPy.
5.0 Iterating on Gridshell Geometry
Up to this point, we've only analysed one possible gridshell geometry. In section 5, we'll identify optimisation criteria and iterate on our gridshell geometry to identify the optimal form. We'll use Blender to quickly generate new hanging chain models and OpenSeesPy to evaluate the stresses developed within these new forms. By the end of this section, we'll have a complete analysis and optimisation workflow for unstrained gridshell structures.
6.0 Conclusions and What Next?
Finally, we wrap up with a brief recap of what we've learned and accomplished in this build. We'll also briefly discuss what we'll be covering in the third instalment of our Gridshell Adventures series.
Ok, with all of that out of the way, let’s get into it!
All Access Membership
Learn, revise or refresh your knowledge and master engineering analysis and design

Access Every Course and Tool
- Over 1040 lectures & over 212 hours of HD video content
- Access member-only 'deep dive' tutorials
- Access all downloads, pdf guides & Python codes
- Access to the StructureWorks Blender addon + updates
- Packed development roadmap of courses & tutorials
- Price Guarantee – avoid future price rises as we grow
- Priority Q&A support
- Course completion certificates
- Early access to new courses
Featured Tutorials and Guides
If you found this tutorial helpful, you might enjoy some of these other tutorials.
Truss Analysis using the Direct Stiffness Method
A complete introduction to the Direct Stiffness Method for truss analysis with a detailed numerical example

Dr Seán Carroll
How to Calculate Reactions using Free Body Diagrams
How to use free body diagrams to help calculate reaction forces using equilibrium equations
Dr Seán Carroll
