Calculating and Interpreting the Second Moment of Area
![[object Object]](/_next/image?url=%2Fimages%2Fauthors%2Fcallum_wilson.jpg&w=256&q=75)
Welcome to this tutorial which is focussed on the second moment of area. By the end of the tutorial, you will be comfortable explaining what the second moment of area is, why it’s important to engineers, how to calculate it and how to interpret the values in the context of civil and structural engineering.
All Access Membership
Learn, revise or refresh your knowledge and master engineering analysis and design
Access Every Course and Tool
- Over 1040 lectures & over 212 hours of HD video content
- Access member-only 'deep dive' tutorials
- Access all downloads, pdf guides & Python codes
- Access to the StructureWorks Blender addon + updates
- Packed development roadmap of courses & tutorials
- Price Guarantee – avoid future price rises as we grow
- Priority Q&A support
- Course completion certificates
- Early access to new courses
1.0 Why is the second moment of area important?
Structural engineers ultimately have two decisions to make when designing individual structural members:
Decision 1 – What is the geometric profile of the structural member – its cross-section shape should be used?
Decision 2 – What are the structural member’s material properties?
For all structural members, both the geometric profile AND the material properties play an important role in determining if the member is suitable to deal with the design effects i.e. bending moments, shear forces, axial forces or torsion. So, if we want to increase the structural capacity of a structural member, shall we improve the geometric profile, improve the material properties or both?
Stiffness is a structural member property which we can easily describe. We will consider two descriptions of member stiffness:
Axial Stiffness is the resistance of a member to axial deformation under the action of axial loading. We say that axial stiffness =
Bending Stiffness is the resistance of a member to bending deformation under the action of bending moments. We say that bending stiffness =
For our discussion, let us assume that the material we intend to use is steel. Steel has an Elastic Modulus, .
So if we want to increase the axial and bending stiffness of our structural member, what shall we do? Firstly, let’s assume that the length of the member needs to remain unchanged in order to fulfil its function – so we can’t reduce . Secondly, let’s assume that all grades of structural steel (S275, S355 and higher) all have – so we can’t increase .
What options does this leave us with? The only other way to increase axial and bending stiffness is to increase the area and the second moment of area .
Increasing the area and hence the axial stiffness is intuitive as we are familiar with calculating the cross-sectional area of different shapes. It doesn’t matter where within the cross-section we add the ‘extra area‘, the axial stiffness is increased in proportion to the increase in area – Simple
Increasing the second moment of area and hence the bending stiffness is less intuitive and often less well understood. The rest of this tutorial will improve our intuition for and understanding of the second moment of area. This will give us the tools to make sensible recommendations to improve the bending stiffness of structural members.
The second moment of area is also referred to as the moment of inertia (just a fancy name!). We designate the second moment of area with the symbol . always has the dimensions of . We must be careful to ensure that we are always consistent with our input measurements when calculating the second moment of area. In this tutorial, we will exclusively use millimetres .
2.0 What is the second moment of area?
So far, we have recognised that the second moment of area is the property which governs the bending stiffness of structural members (assuming a given length and elastic modulus).
The term second moment of area contains two terms which we are familiar with. We know that area describes the quantity of structural material in a given region and that a moment refers to the product of a physical quantity and a distance.
Putting these two terms together, we say that the second moment of area is a description of the distribution of area about a specified axis.
There are two further fundamental statements about the second moment of area which we should keep in mind throughout this tutorial:
-
The second moment of area is a geometric property. If we change the material type or grade, the second moment of area DOES NOT change.
-
As we’ve already mentioned, the second moment of area has dimensions of length to the fourth power, .
3.0 Geometric Axes and Sign Conventions
It is important that axes are clearly and consistently labelled when calculating the second moment of area of a section. The following standard axis definitions are adopted here, which are derived from the right-hand axis system and right-hand screw rule conventions.
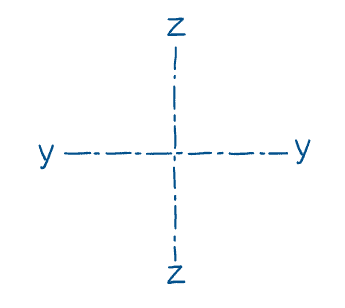
Fig 1. Axes convention
When we refer to bending actions we must always define the axis about which the bending occurs.
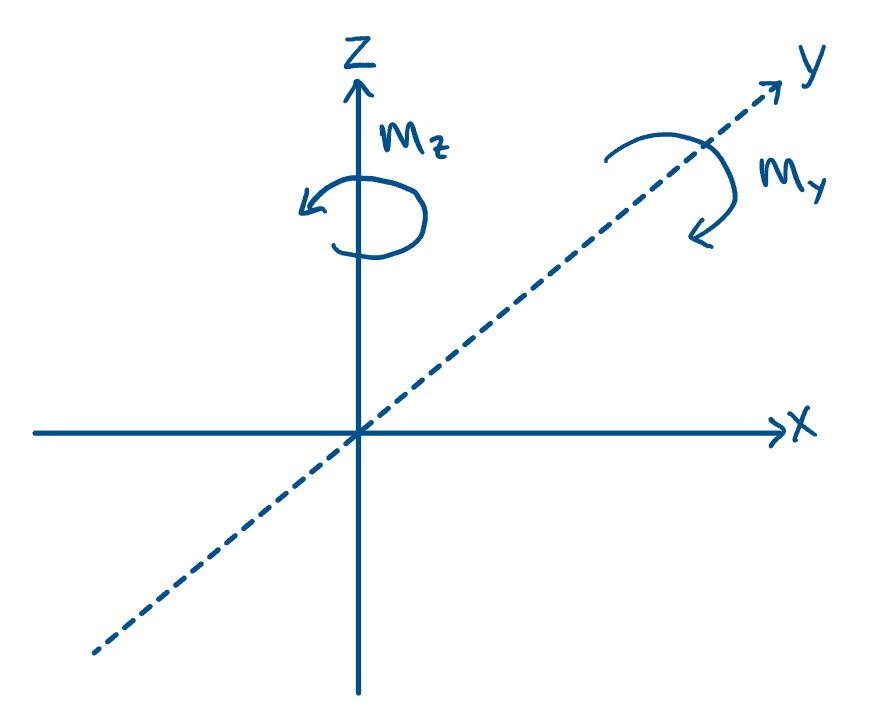
Fig 2. Bending moment convention.
4.0 Locating the Centroid
The precursor to calculating the second moment of area of any shape is to define the position of its centroid. The position of the centroid gives us the point through which the centroidal axes pass. The centroidal axis is the axis about which we determine the global second moments of area.
Let’s consider a simple shape – a rectangle. If we wanted to balance a 2D rectangle on a single spike, where should we place the spike?
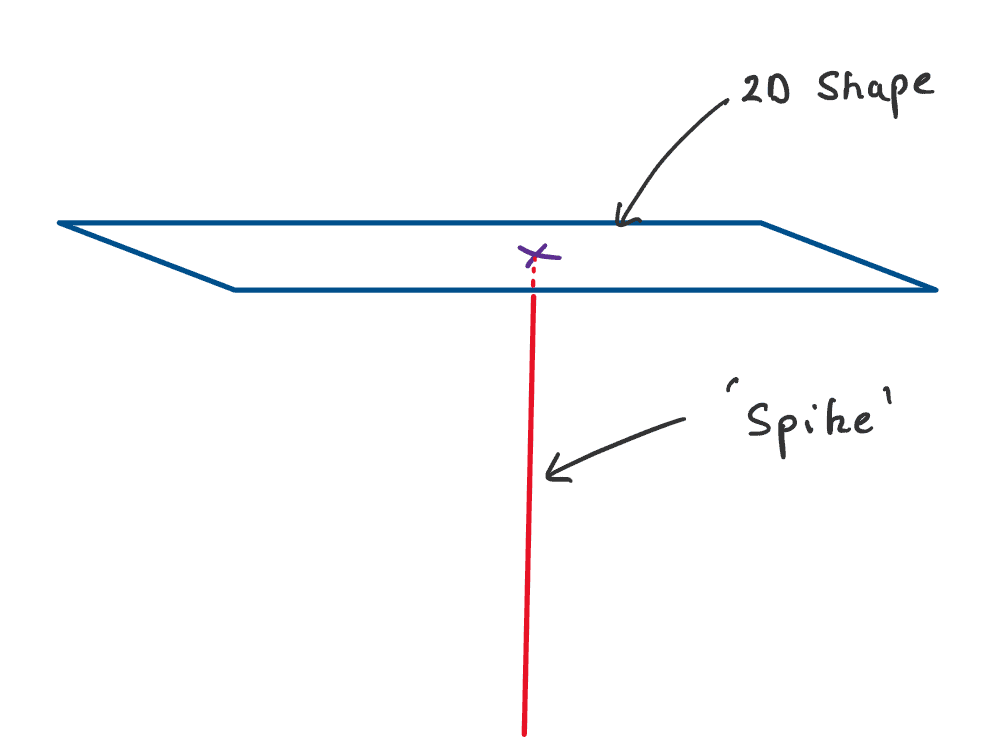
Fig 3. A simple 2D shape balanced on a spike.
As a hint, consider three different options – ‘A’, ‘B’ and ‘C’…..
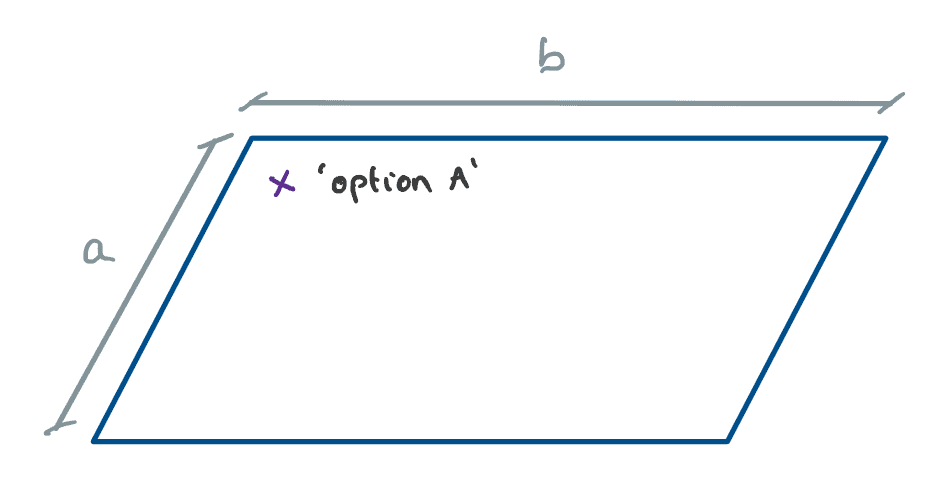
Fig 4. Option A

Fig 5. Option B.
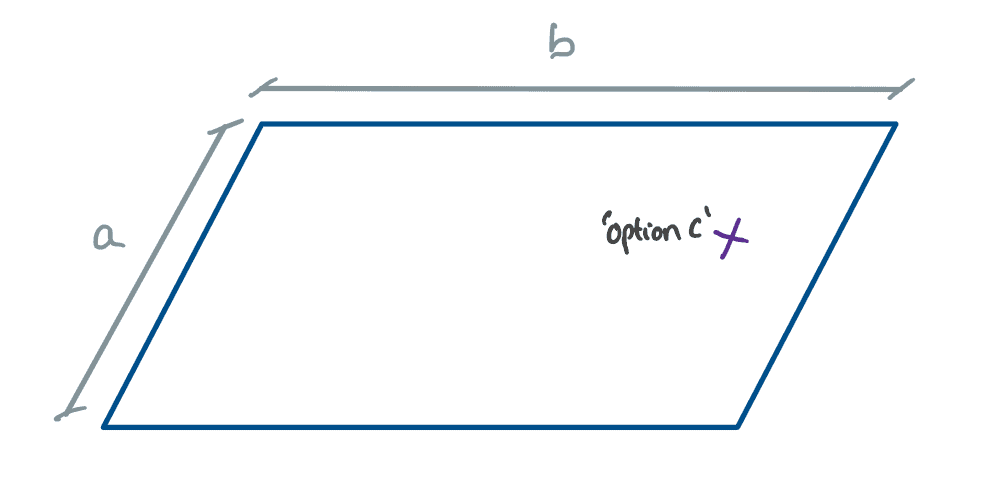
Fig 6. Option C.
Intuitively we would place the spike at Option B, right? In fact, what we have done is located the centroid of this simple shape….without any formula! But what if the shape is not a simple rectangle?
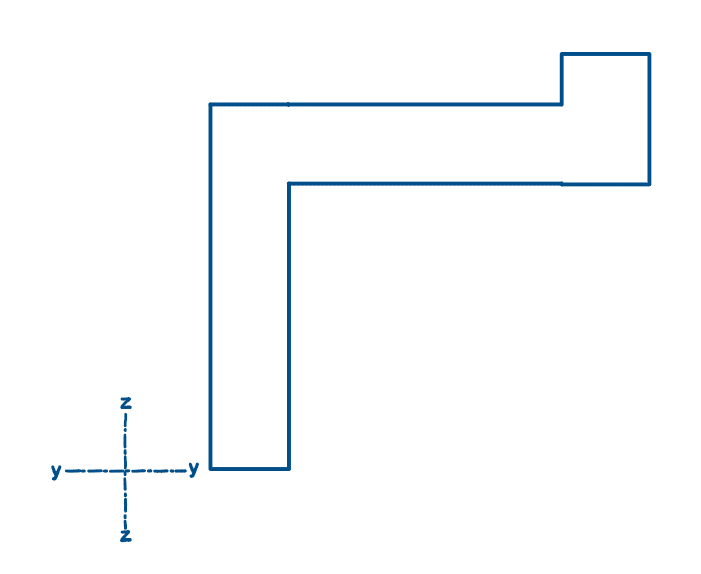
Fig 7. A compound shape.
Not so simple, right? To formalise this idea, we can introduce the following formula, which will allow us to define the centroid of any shape, simple or otherwise. The centroid is a single point in 2D space. Therefore we need a Y-coordinate and a Z-coordinate to define its position.
We will consider the compound section example above to understand how these equations are used.
First, we need to define our ‘reference origin’. We will measure the ‘’ and the ‘’ from this point. The position of the reference origin is arbitrary and can be selected based on user preference. To simplify notation, our reference origin will be placed at the bottom left corner of the overall geometry; this means that and are always positive.
Second, we need to split our complicated geometry into square/rectangular regions, being careful not to overlap regions (as this would mean that the same areas would be counted twice). For this example, we have three rectangular regions.
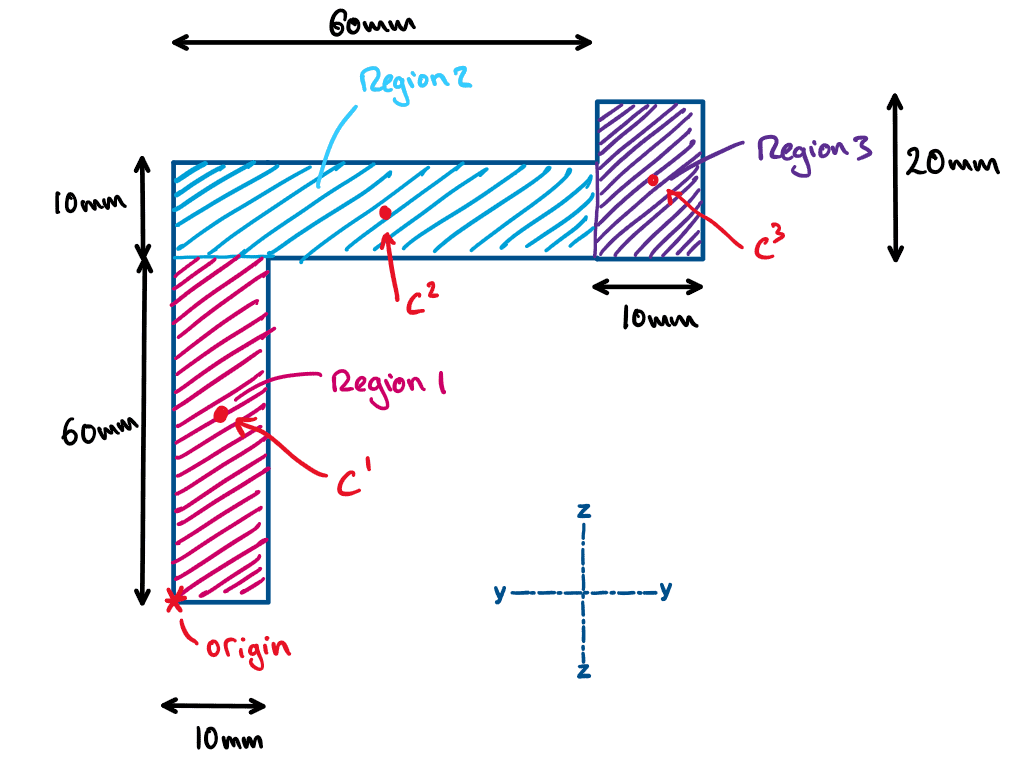
Fig 8. Splitting the compound shape into rectangular regions.
Ok, so we are now ready to start using our formulae.
We will begin by calculating , which is the Y-coordinate of the centroid of the overall geometry. To do this, we invoke the first formula . This formula tells us that we need to find the sum of the products of the area of each region (1/2/3) and its perpendicular distance from the region’s local centroid (//) back to the origin (parallel to the Y-axis).
Note: the local centroid of each region is found following the same logic used when placing our spike at ‘Option B’
where is the area of the segment and is the perpendicular distance from the segment’s centroid to the origin. Therefore, we have:
Next, we will calculate , which is the Z-coordinate of the centroid of the overall geometry. In a similar fashion, we invoke the second formula . Here we are taking the area of each region (1/2/3) and multiplying it by the perpendicular distance from the region’s centroid back (//) to the origin (parallel to the Z-axis).
Ok, so we have calculated the coordinates for the centroid of the overall geometry. If we wanted to balance this 2D geometry on a spike we would place the spike at [].
Let’s draw the centroid onto our diagram.
Note: you might have noticed that the centroid of the shape does not lie within the shape itself… interesting right!
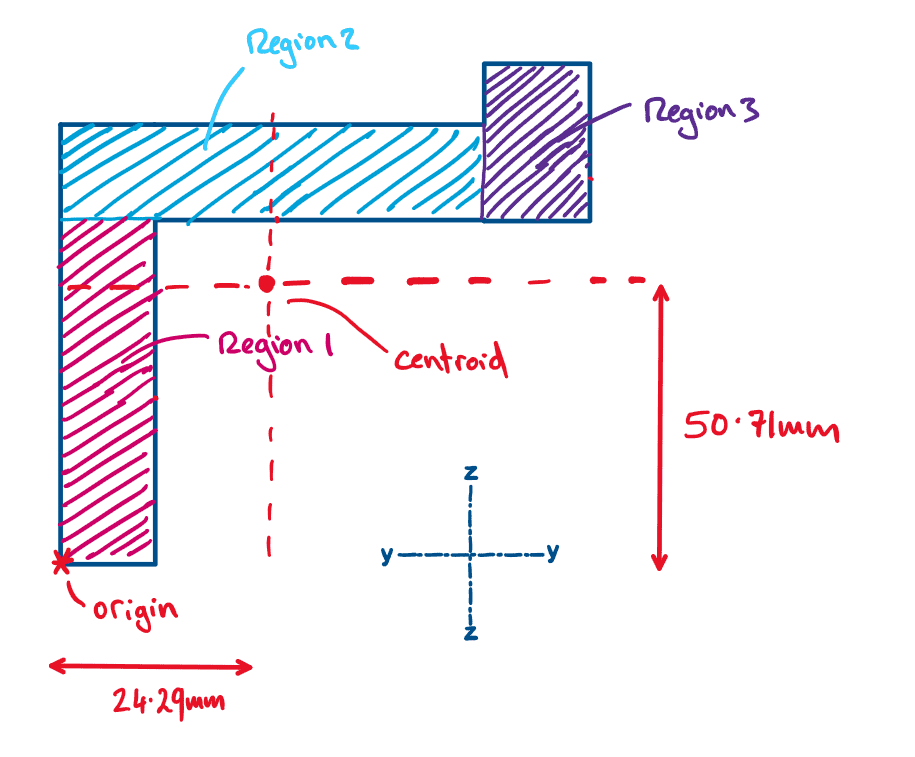
Fig 9. Centroid of the compound shape.
5.0 Second Moment of Area of Rectangles
For any two-dimensional geometry that lies within the Y-Z plane there are three different components which are required to describe the second moment of area:
(1) The second moment of area about the Y axis:
(2) The second moment of area about the Z axis:
(3) The product second moment of area:
Initially, these integral expressions may appear daunting, but once again, we will consider a simple example. This will reveal that in fact, these integrals are just a mathematical way to say ‘the distribution of area about a given axis’.
As civil and structural engineers, we will work primarily with sections that can be split up into square/rectangular regions (in the same way that we divided the geometry in §4.0). Therefore, we consider square/rectangular shapes in the following derivations.
So let us consider a simple rectangular geometry of height, , and breadth, . From §4.0, we know that the centroid of the geometry is at . We place the origin of our Y-Z axes at the centroid.
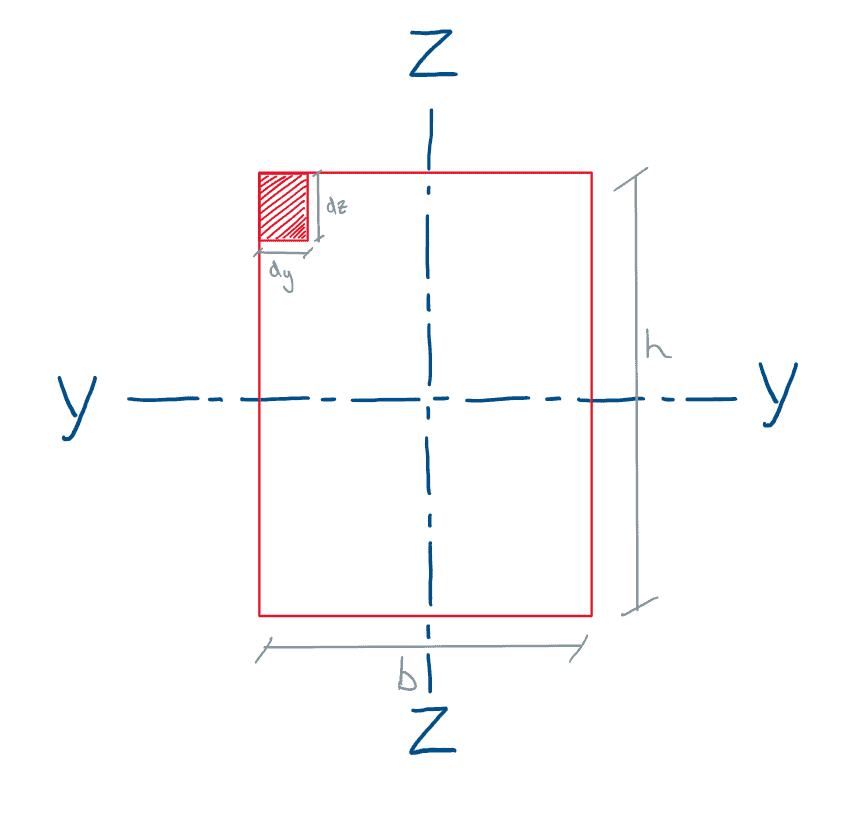
Fig 10. A rectangular shape placed onto a y-z axes.
We will begin with :
From the above diagram, we can say that . is simply the area of a very small region within the geometry. This allows us to re-write our formula for :
Considering the geometry of the section and the centroid, we can say that:
We evaluate the inner integral to give,
And then the outer integral to give,
Moving onto :
We evaluate the inner integral to give,
And then the outer integral to give,
And finally :
Note: for a rectangle, is zero. This is an important result which we will discuss later.
6.0 Second Moment of Area of Simple Shapes
Whilst structural engineers will most commonly encounter sections comprising of multiple rectangular regions, occasionally, one might need to calculate the second moment of area of other common shapes.
The following standard results should be considered for reference:
Rectangle
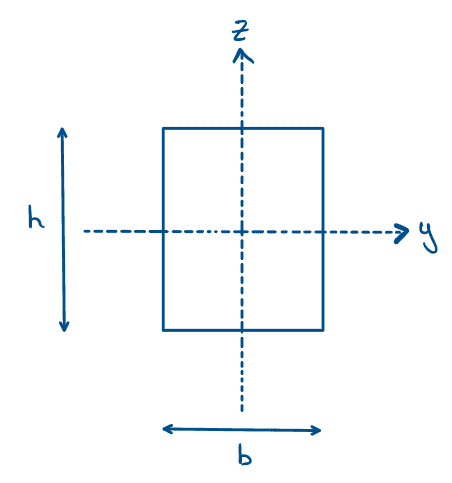
Fig 11. Second moment of area of a rectangle.
Circle
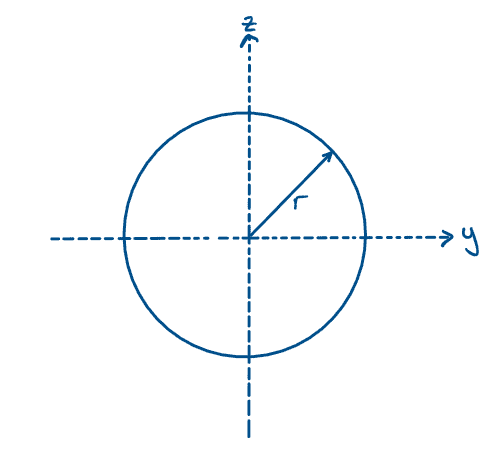
Fig 12. Second moment of area of a circle.
Hollow circle or annulus
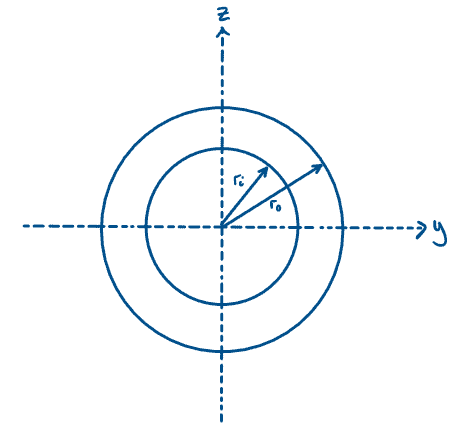
Fig 13. Second moment of area of a hollow circle or annulus.
Triangle
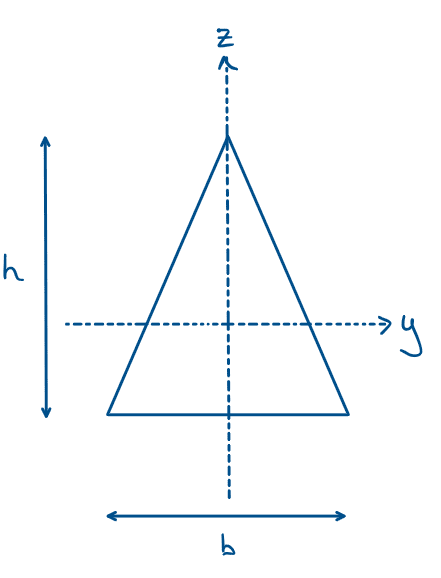
Fig 14. Second moment of area of a triangle.
7.0 Parallel Axis Theorem
We now have a standard result for the second moment of area of a rectangle (and other simple geometries if we need them!) However, a solid rectangle is rarely used as a structural geometry so now we begin to think about the second moment of area of more complex geometries, and in particular those which are used in structural engineering applications.
So the question is, how can we use our understanding of the rectangle to define the second moment of area of more complex shapes?
The link is the parallel axis theorem. This theorem allows us to determine the second moment of area of a shape about an axis which is not a centroidal axis.
The parallel axis theorem states:
where is the local second moment of area about the region’s centroid, is the area of the sub-geometry in question and is the perpendicular distance between the global and local centroidal axes. Similarly,
where is the local second moment of area about the region’s centroid and the other symbols have the same meaning. And finally,
where is the local product second moment of area about the region’s centroid, is the area of the sub-geometry in question, is the perpendicular distance between the global centroid and the local centroid and is the perpendicular distance between the global centroid and the local centroid.
So, if we can split our complex overall geometry into a finite number of rectangular regions, we can use the parallel axis theorem to define , and i.e. the gross second moment of area about the entire geometries centroidal axis.
So, in general, we can say
The above formulae are simply saying that the gross second moment of area is the sum of the local second moments of area for each region in addition to a contribution coming from the position of the region relative to the overall geometries’ centroidal axes.
We now have all the necessary tools to complete three examples, so let’s make a start!
8.0 Example 1 – I Section
The first example is a 610 x 305 x 149 UKB section. So-called I-sections are typically used in applications which require resistance against large bending moments.
Note: when calculating the second moment of area by hand, we typically ignore the radius junction (root radius) between web and flanges. This simplification can be accepted as the impact on the overall second moment of area is minimal.
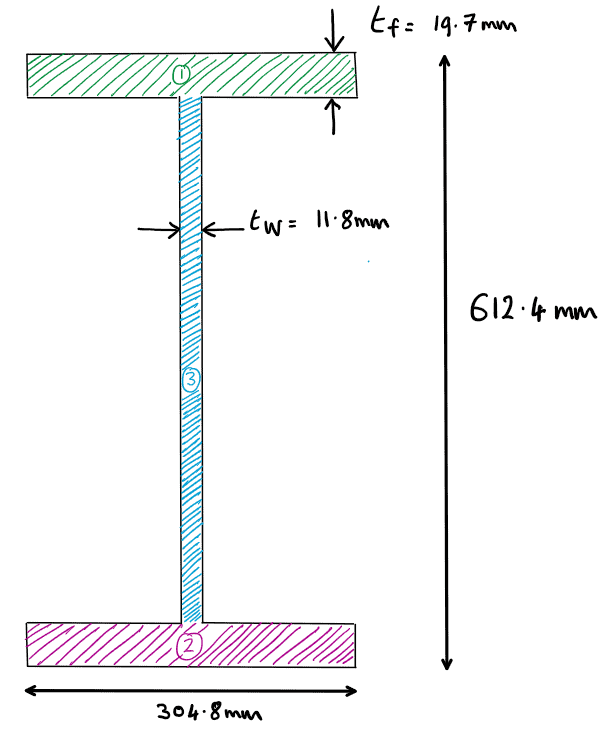
Fig 15. General arrangement of example 1.
Step 1: Calculate the Global Centroid
We start by calculating the centroid using the following formula,
Remember, we take our reference origin to be at the bottom left corner of the section.
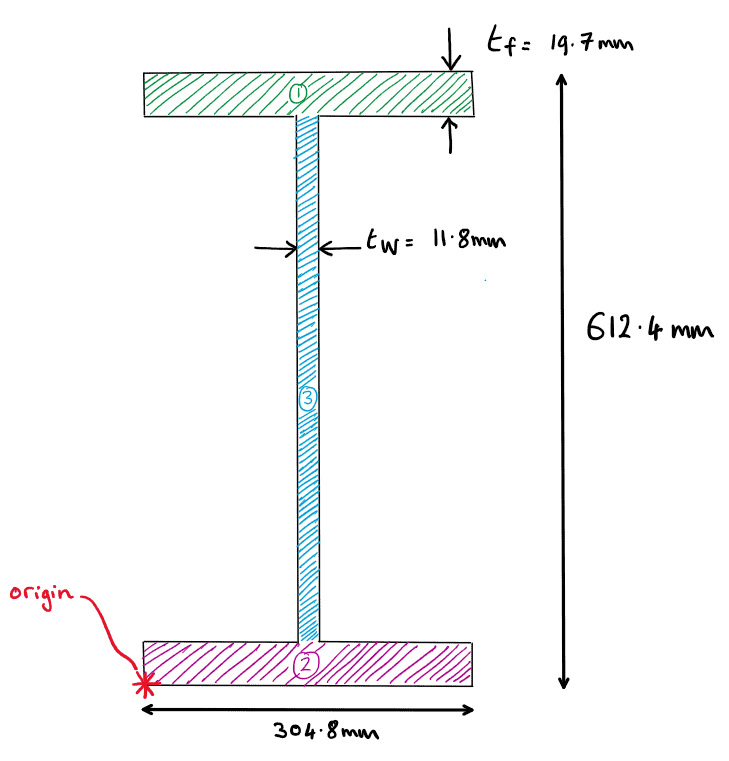
Fig 16. Reference origin for example 1.
Similarly,
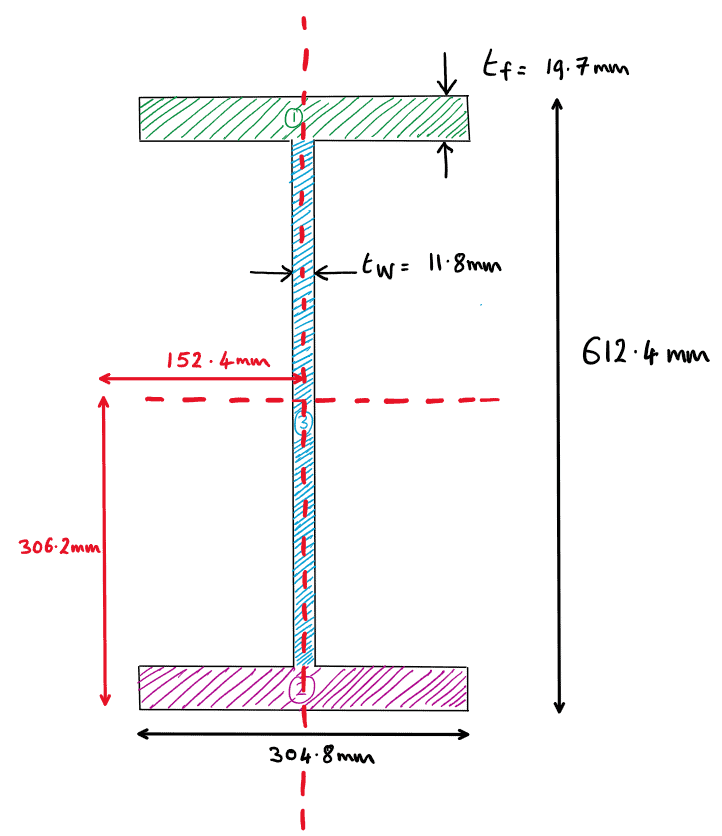
Fig 17. Centroid of example 1.
We should always reflect on whether our calculation results are realistic. So, is our calculated centroid in agreement with what we would expect?
Hint: We have a doubly-symmetric section so we would expect the centroid to be at the midpoint , )…which is exactly what we have shown using our general formula for the centroid.
Now we can proceed to determine , and
Step 2: Calculate
Step 3: Calculate
Step 4: Calculate
So, to summarise the first example:
Let’s think about what these results mean. We have shown that depending on the orientation of the beam, there is a two-order-of-magnitude difference in the second moment of area ( compared to ). If there is a significant difference in the second moment of area, then, by inspection, the bending stiffness of a beam depends on the orientation in which it is used.
Clearly, therefore, if we want to maximise the bending stiffness, we should utilise the largest second moment of area of the section, , and therefore apply load to the beam parallel to the Z-axis.
9.0 Example 2 – Channel Section
The second example is a 150 x 90 x 10 unequal angle section. Unequal angles are often used as structural members under axial force but can also be used to resist small bending moments.
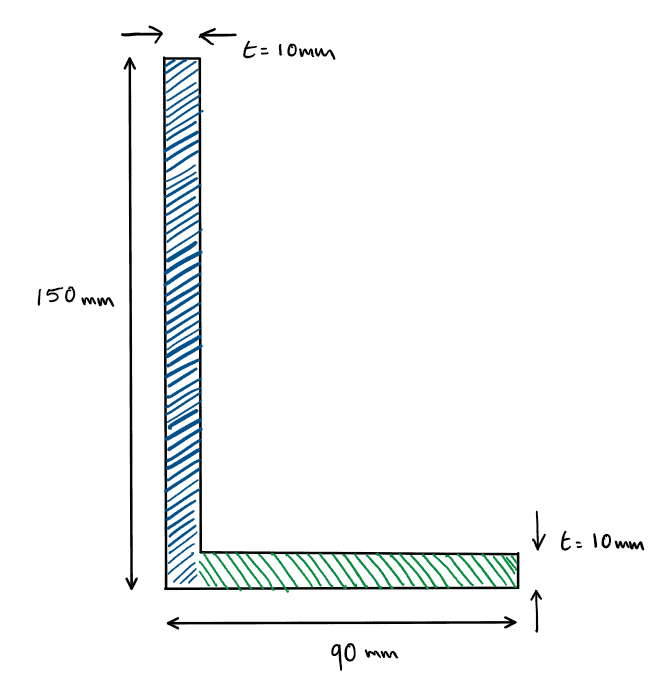
Fig 18. General arrangement of example 2.
Step 1: Calculate the Global Centroid
Remember, we take our reference origin to be at the bottom left corner of the section.
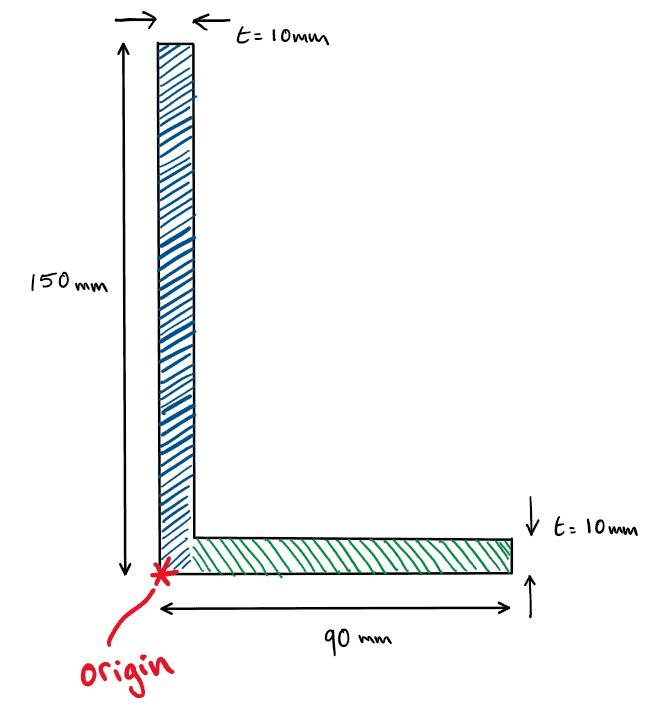
Fig 19. Reference origin for example 2.
Similarly,
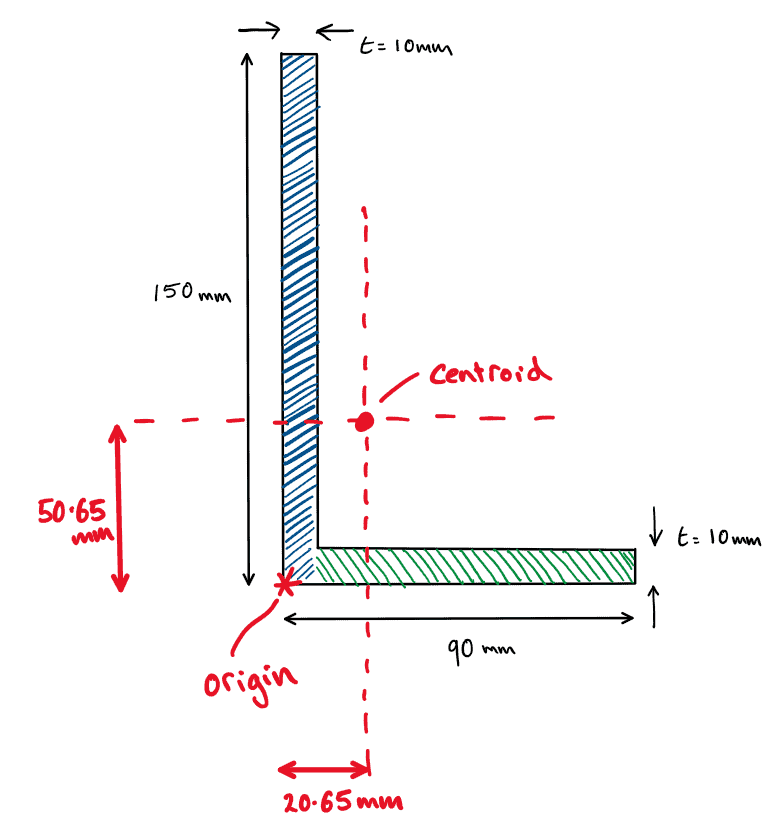
Fig 20. Centroid for example 2.
Is this what we would expect?
This example is less intuitive. We have a section which is asymmetric across both the Y and Z axes. It would have been difficult to determine the centroid without using our formulae.
Now we can proceed to determine , and .
Step 2: Calculate
Step 3: Calculate
Step 4: Calculate
To summarise:
We have shown that depending on the orientation of the beam, there is a small difference in the second moment of area ( compared to ). The difference is much smaller than what we observed for the I-section. This makes sense as we have already mentioned that channel sections aren’t typically used within applications which require large bending capacity.
Interestingly, unlike the I-section, the product second moment of area () does not equal 0. We will discuss the importance of this in the final sections of this article.
10.0 Example 3 – Z Section
The third example is a Z-section. Z-sections are commonly used on pitched roof structures to span between rafters and support roofing materials.
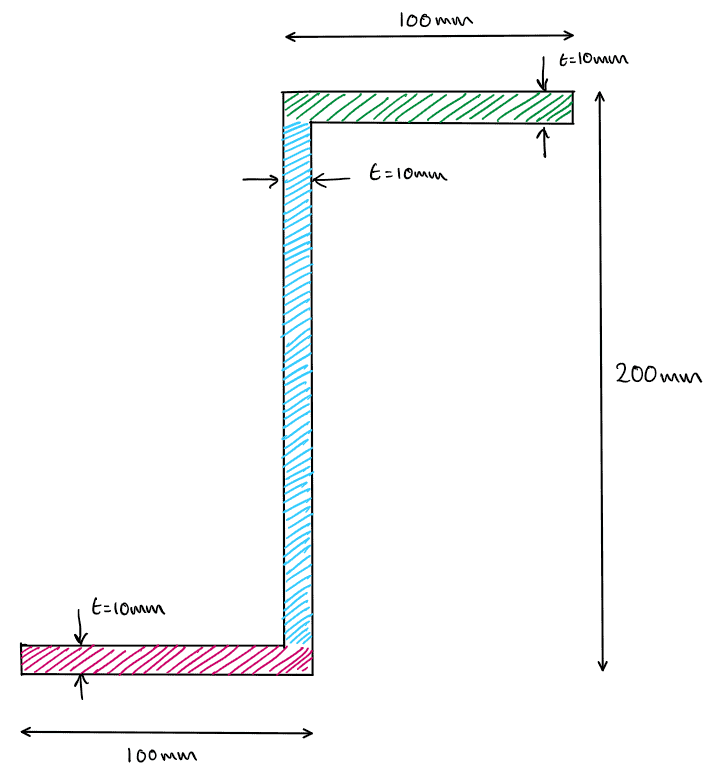
Fig 21. General arrangement of example 3.
Step 1: Calculate the Global Centroid
Remember, we take our origin to be at the bottom left corner of the section.
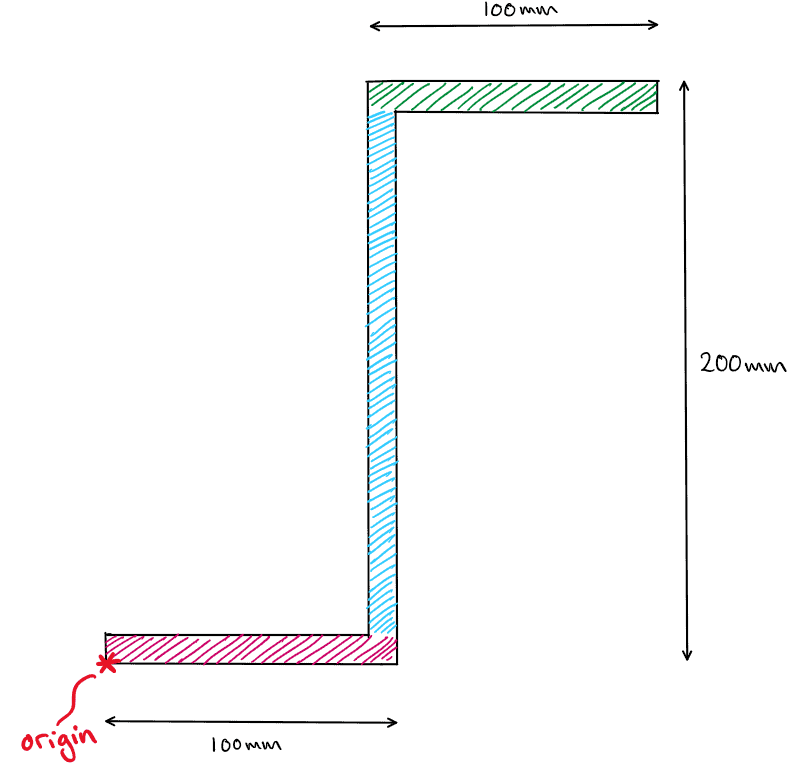
Fig 22. Reference origin for example 3.
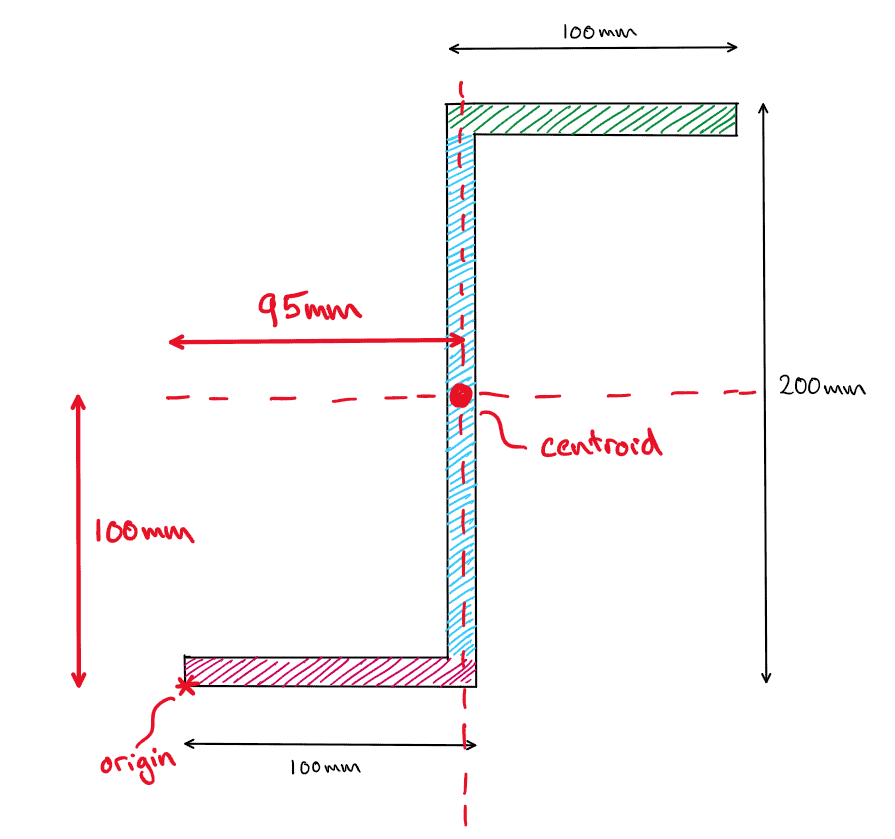
Fig 23. Centroid for example 3.
Is this what we would expect? We have a symmetric section (symmetric about an inclined plane) and so we would expect the centroid to be at the origin of a rotated axis, which is exactly what we have shown using the formula.
Now we can proceed to determine , and .
Step 2: Calculate
Step 3: Calculate
Step 4: Calculate
To summarise:
We have shown that depending on the orientation of the beam, there is a an order of magnitude difference in the second moment of area ( compared to ).
Interestingly, unlike the I-section the product second moment of area () does not equal 0. We will develop our intuitive understanding of these results in the final section of this article.
11.0 Understanding the product second moment of area ()
At the start of this tutorial, we established an axes convention. In the three examples we have covered, the second moment of area has always been calculated with respect to the two axes (y and z). Let’s think about our results from examples 1, 2 and 3.
In example 1 (I-Section), we obtained , in example 2 (Channel section), we obtained and in example 3 (Z section), we obtained .
Thinking about the three examples we have covered, are the values of and the maximum possible values which we could obtain for that specific section?
It is not immediately obvious, but if we were to invoke a new axis system (u-v) which is slightly rotated compared to the y-z axes, could we obtain a higher value of and compared to our existing axes of and ?
These new axes are called the principal bending axes because they represent the orientation of the section, which gives the maximum and minimum values for the second moment of area.
The magnitude of the product second moment of area () indicates to us how ‘far away’ the assumed y-z axes are away from the principal bending axes (u-v). Let us revisit our three examples to understand how this works in practice.
In example 1 (I-Section), we obtained ; therefore, the y-z axes are coincident with the principal bending axes (u-v) and and .
In example 2 (Channel section), we obtained and therefore the y-z axes is not the principal bending axes and the u-v axes will yield and . The positive sign of indicates the direction which we need to rotate the y-z axes to obtain the principal bending axis (clockwise).
In example 3 (Z section), we obtained , and therefore the y-z axes is not the principal bending axes and the u-v axes will yield and . The negative sign of indicates the direction which we need to rotate the y-z axes to obtain the principal bending axis (anti-clockwise).
12.0 Obtaining the orientation of the principal bending axes
As we have discussed, for sections where , the principal bending axes (u-v) are not coincident with our assumed y-z axes.
It is important, therefore, that we can determine the orientation of the principal bending axes (u-v) so that we can identify the orientation of the structural member which will yield the largest bending stiffness (i.e. utilising the largest possible second moment of area).
We can do this using three simple formulae:
You may recognise these formula from a previous EngineeringSkills tutorial on Mohr’s circle. In fact, the same theory developed in that tutorial on stress analysis, maps directly across to this discussion of second moments of area. In particular the concept of principal stresses and principal axes is a direct analogue to the principal bending axis introduced here.
Let’s revisit example 2 to understand these formula, recall:
Evaluating :
Similarly,
And finally, is:
We can re-draw example 2, showing the original axes system (y-z) and our new principal bending axes (u-v)
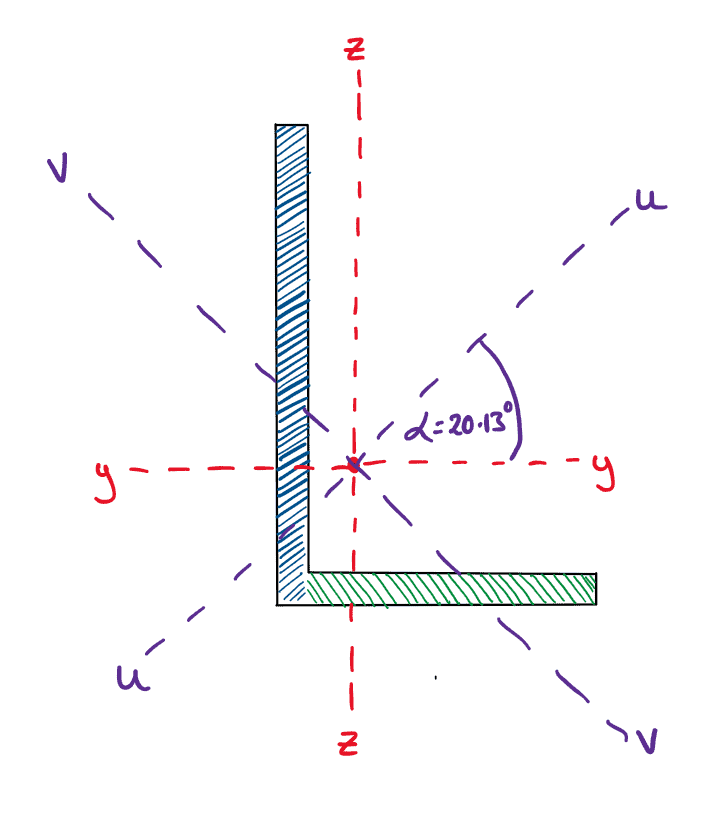
Fig 24. Superimposition of the principal (u-v) axes over the original y-z axes.
So, if we wanted to orientate the channel section in order to utilise the section’s maximum second moment of area, then we should apply transverse load parallel to the V axes (i.e. creating bending about the U axis).
13.0 Wrapping up
Within this tutorial, we have developed methods to calculate the centroid of a structural section and the three descriptions of the second moment of area for a section.
We have also developed a method for calculating the principal bending axes for a section which helped us recognise that certain sections are more suitable in certain applications than others. All structural sections have a specific orientation which will yield the maximum and minimum bending stiffness.
You might be asking yourself if all this calculation work is a necessary skill for a structural engineer? Well, for the majority of cases, the centroid and second moments of area of common structural sections are available from industry data tables (and these are always helpful for checking hand calculations!).
However, complex or bespoke sections will not be covered in data tables, and therefore it is essential that a structural engineer can calculate these fundamental properties. For example, steel plate girders are typically required when an off-the-shelf I-section isn’t suitable. A structural engineer would need to calculate the second moment of area for such a bespoke section.
Thats it for this tutorial. I hope you have found the content useful and informative – if you did, tell someone else who might also find it helpful!
Featured Tutorials and Guides
If you found this tutorial helpful, you might enjoy some of these other tutorials.
Influence Lines - A Complete Introduction for Civil and Structural Engineers
Learn how to construct influence lines for determinate and indeterminate structures

Callum Wilson
Plate Girder Design to Eurocode 3
A step-by-step guide to the design of code-compliant steel plate girders.

Callum Wilson
Building a Mohr’s Circle Calculator for Stress Analysis in Python
Once complete, you will have your own stress analysis Python code

Dr Seán Carroll


